 DE
DE  EN
EN For Unix , Linux, AIX, Solaris etc. Please install the W-ELP (Windows based) demo version and then upload the final forms to your system.
The idea of ELP forms is to print any document to file using a PCL5 driver. This file can be printed on almost any laser printer and on larger ink jet printers. Usually those devices can all interpret the well-defined PCL5 data stream standard. This PCL5 print file is added to ELP. The process takes less than 2 minutes, of course without the forms design.
A detailed guide for forms generation and usage can be found in the Self training: Generate and usage of ELP forms document which can be accessed via this button:

Using forms on non-Windows based platforms
Install the Windows Version of ELP and convert the prn file the same way, as described below.
Then upload the file *.mac files from the c:\ProgramData\WELP folder to the non-Windows system into the so called WorkPath, defined by the ELP Command Line Argument -dxxx.
Notes:
-
The file name ending *.mac needs to be written in lower case!
-
The dynamic generation using the ELP_Command=F####; or <<F####>> is also working for those implementations.
Forms Generation
DO NOT print the form through an ELP enabled Queue/Driver, as ELP may then insert the Demo watermark on the page. And once you purchased the product, the mark is still there.
-
Generate a form with any program, like for example MS Word. You may add any font, any graphic, but we recommend using printer internal fonts. If you intend to print watermarks (just in case the provided demo forms don't fit your needs), then you may use the provided MS Word Forms & Field Installer document. In that case you can also generate the W-ELP macro with the provided main menu option. The disadvantage of this option is that some additional settings described below can't be applied.
-
The most convenient way to install forms is to print to file a single page of the the document which reflects the form itself. In any case it is mandatory to use a PCL5, PCL5e or PCL5c driver! A good practice is to add a printer named "ELP FORM" and use a proper PCL5 driver for that queue. And again, do not activate this queue in ELP! If you are unsure which PCL5 driver to use you can download some PCL5 drivers here.
- If you have Kyocera printers / MFPs then it is recommended to use the Kyocera Universal Classic PCL5 driver.
-
After you have designed the form, positioned the signature or Logo on the blank page, just print the document using the PCL5 driver to file. The storage location can be anywhere, but we recommend the WorkPath folder c:\ProgramData\WELP. DO NOT print through an ELP enabled Queue/Driver, as ELP may then insert the Demo watermark on the page or even worse: applies all rules.
- Do not generate the prn file, using an ELP activated queue because you might include the demo watermark into the form. It is recommended to use a separate queue, which is NOT ELP activated. Their for you do not need any licenses. The queue is most likely set to the printer port FILE.
Hint:
Split a single letter head into it parts, that could make updates easier, like
1000.mac logo
1010.mac footer
1020.mac address line in the envelope window
2000.mac Advertisement 1?
So the ELP_Command might be: C1:1F1000F1010F1020F2000;C1F1000;
C1:1 is only page one
C1 remaining pages will only hold the logo
ELP offers several ways how forms/macros can be installed, normally it is recommended to use the one time installation with the ELP Control Center software. This is described here:
- Open the Macros Register Tab
- Click on Add and select on the next menu the previously printed forms file. Then fill out the next window:
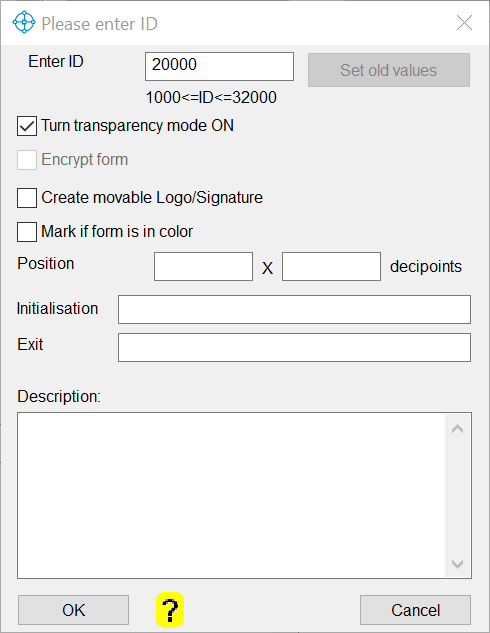
| Form ID |
The ID is the ELP internal name for the form. It must be entered between 1000 and 32000.
|
| Set old values | If the entered ID already exists then all settings from this screen can be automatically pre-filled by hitting this button. The settings are retrieved from the corresponding .MAT file which must reside in the Workpath folder. |
| Turn transparency mode to ON | By default the converter turns all NON transparency commands in the data stream into the transparency mode. The form can be overlaid on the data and does not wipe any under laying data off. In rare cases and mostly in color forms, this turns into faulty results. In those cases turn the function to off. It is also recommended to turn it off for all forms, which are exclusively called with the ELP_Command G. Check here for an example. |
| Encrypt Form | In order to encrypt forms you need to set first the encryption key in the rule GLOBAL of the startup ini file (convert.ini). The macro is then encrypted and can be saved for example on external USB sticks. |
| Create movable Logo/Signature |
The form top left position of the item will be exact at the position where it is called. The Control Center will only add the first graphical part of the printed file. In order to generate a movable Logo/Signature, open a new document and set it to the minimum page margins. In MS Word for example open under file the option page settings, set the left and top margins to zero, click ok and finally let Word correct the margins to the minimum driver settings. Then insert the graphical object top left and size it according to your needs. Print it to file and activate this checkbox. [Search for Signature Position] ; This trigger information like here !Sig_Smith! Needs to be set in the print data stream ; e.g. With an MS Word Print Field Search_Windows=!Sig_Smith! ; Change the text to the form call, see next page. Replace_Binary=\x1B&f1000y3X ; Speed up the process ReadOnlySearchKeys=ON |
| Mark if form is in color | Special setting is applied, that the form will be start printing in a well-defined color mode. |
| Position | The form will be moved on the page in decipoints (units) equal 1/720 inch. Use the option to correctly overlay a form on the user data. Note: The same thing can be applied within the ELP_Command F: F####;[XMove;[YMove;[Rotation;]]]; |
| Initialization | Add any text or PCL sequences, which will be sent right at the beginning of the macro. If the form for example is always printed with another form, e.g. the company logo, add here the command PCL call: \x1B&f502y3X, but you may use the ELP_Command F for defining the same setting. |
| Exit | Same as initialization, but inserted right before the macro ends. You can add for example here form feeds and call any additional forms: \x0C\x1B&f501x3X for example will insert on the next printed page the terms and conditions. But this can also be done with ELP_Commands. |
| Enter Description | Enter any description that other administrators will be able to understand the content of your forms. |
Done, you can now test the form. If ELP is not used under MS Windows, you finally need upload the form binary into the directory, named by the -d command line parameter
The next print job may already address the form, if it is used in any applied rule.
There are 4 other methods for automatic forms generation, where 2 and up are generation the forms on the fly out of the data streams. This is one way to collect a single page and use it at a certain position in the real printing data stream, e.g.using the ELP_Command EE or EB.
-
One of it is the Forms & Field Installer Document. Here you can take a closer look at it. This one is more semi automatic.
-
The data stream is analyzed by Rules theory, how to trigger them and then use the ELP_Command F####; where #### is the number for the macro.
-
This method is to use the ELP_Command F# in the data stream (Not the C#[:#]F#; command). If found <<F1000;>> in the data stream, the first page is directly converted into macro 1000. Please note, that you need to have the key ELP_SearchCommandInDataStream turned ON and the keys ELP_CMD_Start_Char and ELP_CMD_Stopp_Char needs to be at their default value (Default: Simply all 3 keys are not provided).
-
Once a rule detected, that that first page of the stream should be converted into a macro, call PPAdmin directly out of the rule set (Call key) and add those PPAdmin Command Line Options: /t PrintFileName.prn MacroNumber [/d] [/e] [/w TimeInSeconds]
In any case ELP only converts the data streams first page into the macro, which is automatically stored in the workpath folder.
Please be aware, that the ELP Control Center Macro Tab method takes more care about the content of the stream and may fix for example color problems. So it is always recommended to use the method through the ELP Control Center GUI.
See further command descriptions on the next pages for detailed information.
Also by default ELP will parse any loaded macro and run it against all search rules (Not Trigger). So for example macros can contain variables, and these will be overwritten by the real content of the variable. See also: Watermarks and Page counter.
If no such things are needed, you may speed up the process, by using this key: FastMacroLoading=ON which then will take the form and send it unchanged to the printer.
In order to prevent the tool from reloading a form if a data stream parsed a second time, the esc sequence \x1B)s-999Z is added before the macro sequence. Once the parser detects this sequence in the data stream, no forms will be loaded for the whole job!
Related articles: A quick print test with the form, MS Word Forms & Field Installer