There are at the beginning of your activities 5 ways to detect, if ELP is successfully installed.
- Open the Install Tab and right click on the activated queue and select the test option.
- Open the Configuration Tab and select the test button.
- Open any of the provided test samples in Microsoft Word: START - All Program - Enhances Laser Printing - Examples - Load provided example "Invoice" using the Start Menu and print it using a PCL 5e or 5c enabled printer queue.
- Read and follow the Self training, accessible via button at the bottom of the ELP Control Center
or generate your own test sampel like described here, using MS Word:
You may want to generate your own Microsoft Word, using Forms and ELP-Commands: Create a new empty document, type some sample text ("e.g. 'this is a welpprint sample test') and follow these steps to print a test form.
-
First, enable field code to be seen. Go to 'Tools' -> 'Options'; in the 'View' tab, enable checkbox 'Field codes'.
-
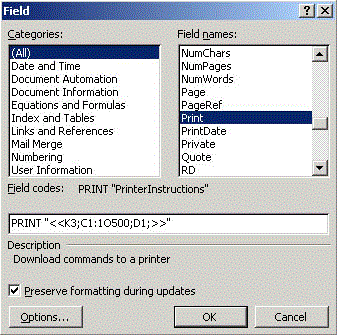
Older Word versions: Go to 'Insert' -> 'Field' and select the Print command (Windows 97: German Druck) in the left list box ('Field Names').
Newer Word versions: Einfügen/Insert - Schnellbausteine/Qucik text - Feld.../Field... - select the Print field
To view print fields, you need to turn on the option "Show fileds": Klick on the Word icon top left, then select "Word -Options" - Enhanced - scroll down and check "Show field options instead of values"
Older Word versions have the button under Tools - Options.
-
In the text box below (after 'PRINT'), enter: "<<K3;C1:1O500;D1;>>"
-
Now, if you select 'File' -> 'Print', the print dialog appears and you must select a printer. Be sure to select a PCL 5e printer, which has the processor welpprint configured; otherwise, the form won't be applied to the document.
-
The result should be three pages with your sample text combined with a W-ELP example form/watermark
-
To create your own form/watermark, just design an appropriate image (Photoshop, etc.) or layout (Microsoft Word, etc.) and print it to a file (should have the suffix .prn).
-
Open the ELP Control Center and push the 'Add' button in the 'Macros' tab. A file dialog appears and you may select the created .prn file. Give it a number between 1000 and 32000, for example 1500. Now, it'll appear in the List box as 1500.mac.
-
Follow steps 2 to 5 and substitute the [..]O500[..] with [..]O1500[..] (your generated MAC file): "<<K3;C1:1O1500;D1;>>"; printing it should result in the customized form/watermark to be applied.
NOTE: If you are lost in space with your configuration then you may want to reset ELP to its default after installation settings: Please copy in the \ProgramData\WELP folder the file convert.ori over the convert.ini file.
-
Maybe save your ini file before overwriting.
-
Exit the ELP Control Center if open
-
Please copy in the Workpath folder (default: c:\ProgramData\Welp) the file convert.ori over the convert.ini file.
-
You you can start with a new configuration by reopening the ELP Control Center
 DE
DE  EN
EN 