 DE
DE  EN
EN During the initial step you will need to scan your network for one or all Ricoh printer(s). The number of times how often the green progress bar on the right-hand side of the "Start scan" button cycles is equivalent to the number of SNMP communities which needs to be scanned.
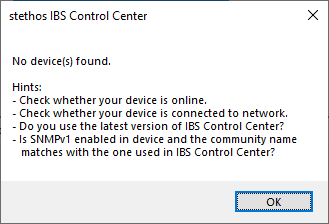
If no devices are found please follow the given hints:
If devices are found IBS Control Center (Intelligent Bar Code System Control Center: IBS CC) advises which devices are:
- IBS capable
- Have IBS already installed and running in demo mode*
- Run IBS fully licensed*
* If IBS CC - in terms of network - is not connected directly to the device (e.g. remotely, through VLAN, firewall, ...) it might be correctly installed and working anyhow. If you have a reasonable suspicion send a well known test file which contains barcodes and check the printout.
If IBS is up and running (either demo or licensed) in the device the column "IBS Comm.port" is populated with the IP port number and the column "CONVERT" shows the internal Firmware revision of IBS.
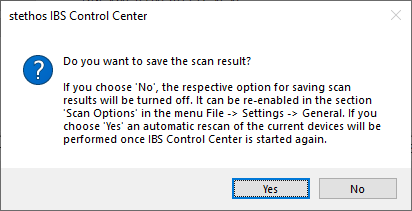
Unless having it turned off in the settings menu the IBS CC lists the devices of the last scan.

We recommend to turn that function off or choose No on exit if you are a support person and visit different companies:
Note: As some of the devices could be powered off, IBS CC checks again the accessibility of the devices and remove them from the list is they are not available.
As some new devices could have been set up in the meantime, or are now powered on, you may want to run a new Search or simply check if the last searched devices are still accessible.
The table provides the information whether a printer model supports IBS.
If there are installation notes available for a specific device, they will be automatically displayed once the device is selected.
| Used SNMP communities | In order to read back information from the devices, the SNMP protocol must be enabled (Simple Network Management Protocol). If no custom SNMP project was added the used community names are public and admin. However especially larger companies use for security reasons their own community name[s]. Click on Manage.. to define any available names in new projects or apply an existing project setting. |
||||||||
| Local Networks | Select this option to search for all Ricoh devices that are on the same sub net of your network. IBS generates a broadcast on the net and the powered-on devices will react on the request |
||||||||
| IP address range | All TCP/IP addresses within the entered range and sub net mask are pinged one after another. Note: Broader ranges will take a long time to scan because each address not found takes about 2 seconds. You may speed up the search by reducing the SNMP time out in the Settings menu. However, there may be a disadvantage should the Ricoh device fail pinging back in a suitable time frame. |
||||||||
| Single device | This option detects a single device and is the fastest option. | ||||||||
| Start scan | On selection and depending on the above selected search mode, all found devices are displayed in the table below. While scanning, the Settings menu cannot be accessed. |
||||||||
| Refresh found devices | Be sure to check if all listed devices are still accessible. If they are not, the device will be removed from the list. | ||||||||
| Check license database | This button is inactive, when no devices are listed in the table or all license files are downloaded. This button helps to maintain all devices with licenses. What it does for every device listed in the table:
|
||||||||
| DC-specific doc. | Link to the official Ricoh devices specific documentation | ||||||||
| Device table | This table lists in the Scan view usually All found devices. The columns can be
|
||||||||
| All IBS capable Not installed Installed Demo mode Licensed |
List all found Ricoh devices, even if they cannot be IBS enabled. List all found Ricoh devices which can be IBS enabled. List all found Ricoh devices which can be IBS enabled but IBS is not yet installed (Demo or licensed version). List all found Ricoh devices which have IBS in demo or fully licensed installed. List all found Ricoh devices which have IBS installed, but still operate in demo mode. List all found Ricoh devices which have IBS enabled and are licensed. |
||||||||
| Note | The text file models.ini lists all supported devices. You can easily add additional devices. Hint: If you know that a specific IBS version runs as well on an unsupported model, you may add here the model description. |
Notes:
- Older printers are rarely updated, therefore new features might only be supported by newer versions. More information on that topic can be found here.
- If your printer / MFP is not listed as supported, please look here to see if it's already on the roadmap to support it.
- HDD in the Location column can also be an eMMC for certain devices like IM C530.
- Select Network Adapters
Network adapter settings
This popup window (example see below) appears after starting scanning once the first option is selected: Local Network(s). IBS CC lists all network adapters incl. virtual adapters and you have the option to select / deselect any of these adapters. At least one adapter must be selected.
Note: Selecting only the correct adapter speeds up the scanning process.

If your printer / MFP is not found, then you may check the SNMP community setting on the device. If that still does not work send the log file to