 DE
DE  EN
EN 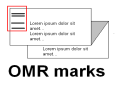
OMR Barcodes are used for mailing documents with variable page counts. The barcodes are used to ensure that the documents are separated correctly and fed into envelopes by Folding and Inserting Systems.
Besides the lines, ELP can postal optimize your mailing and insert flyers or advertisements on the fly. Based on a database ELP can decide if the document needs to be printed or faxed or e-mailed .
The description of all input options of this window is here.
The OMR barcode tells the inserter to collect the actual drawn piece of paper or to insert the actual plus the already collected pages into an envelope. In order to make the barcode safe, a parity bit may be added. Also an automatic pager numbering ensures that the inserter does not draw several piece of paper at once.
The OMR functionality with ELP provides an easy to use, safe and fully automated way, for OMR barcode printing. For defining all OMR settings you may use the Rule Assistant menu OMR - SET dialog.
The following inserter brands are supported:
Stielow, Hefter, Pitney Bowes, Francotyp-Postalia, Kern, PFE, Neopost
Please note that other manufacturers like Neopost etc. often also support the same type of barcode printing / reading
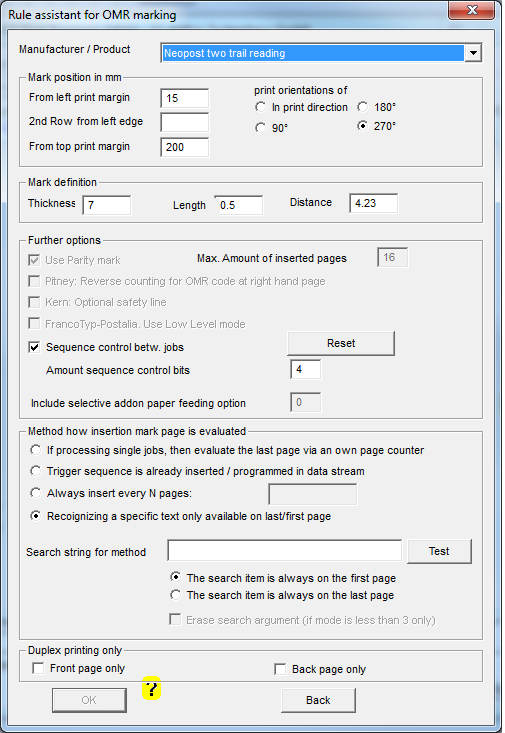
The easiest way to set the OMR definition is to use in the Configuration Tab the Rule Assistant and there the OMR set menu.
As an Example: Using OMR Barcodes
The barcode lines can be positioned freely around the page, in any orientation and print direction
The OMR lines are by default 7.5 mm long, 0.5 mm wide and distance between each line is exact 4.32 mm. If this specification does not fit your inserter requirements, use the appropriate command keys: OMR_LineWidth, OMR_LineHeight and OMR_LineDistance. All values are measured in millimeters xxxx.xx.
When the code is positioned along the long page side from top to bottom, use the 270° orientation.
Some of the barcodes support page numbering (sequence control), insertion of additional papers, parity checks, eject documents, stop the machine etc. They are usually all configurable.
Like the job splitting, ELP needs a trigger in form of a special escape sequence: <Esc>)s-990Z on each last page to be inserted into the envelope. Last page is seen from the way the machine inserts the papers, so it could be also the first page of the document.
Actually the method of inserting this trigger on that last page is exactly the same as described at job splitting. So these three methods are available:
- Recognizing a specific text only available on last/first page
- If processing single jobs, then evaluate the last page via an own page counter
- Trigger sequence is already inserted / programmed in data stream
If you are not able to insert this sequence directly into the data stream, like for example with MS Word inserting the field 'PRINT 27 ")s-990Z"', use SEARCH_ keys to find a piece of text, which is only used on the last page, and then the ADD_KEY to tell ELP to insert the Control Sequence.
For activating OMR barcodes use the key: OMR_ENABLED and turn it on. Usually the OMR function is dedicated to a specific printer queue, therefore you may first add the queue control in form of a "NEW SECTION" to the ini file. These commands can also be placed into any searched or triggered section.
Here is the listing of the supported machines or strokes. If your machine is not listed, please check if it supports one of the other machines. if not then ask for a quotation to add the OMR marks pattern into our ELP solution. It is not at all expensive.
| Product | Possible OMR marks configuration | convert.ini type name |
| Neopost / Stielow | Start - Insert [- Move Out] [- Feeder Bits] [- Sequenz Control] [- Parity] - Stop | Stielow |
| Hefter - Basis | Start - Start - Insert - Insert | HEFTER-BASIS |
| Hefter - Sequenz | Start -Insert - Sequenz Control - Group | HEFTER-SEQUENZ |
| Hefter SI 2200/SSI2250 small | Start -Insert - Parity [- 1 Feeder Bit] - Sequence Control | HEFTER SI2200 SMALL |
| Hefter SI 2200/SSI2250 full | Start -Insert - Parity - Don'tClose [- 1 Feeder Bit] - Halt - Sequence Control | HEFTER SI2200 FULL |
| Hefter SI 3300 / SI 3500 | Start - Safety - NOT EOC - NOT BOC - Parity -Timing 1 [[- Feeder 1] [- Feeder 2]] - Stapling - Timing 2 [- Sequence control - Timing 3] | PITNEYBOWES_SEQUENZ |
| Hefter SI 4400 / SI4200 | Start - Safety - NOT EOC - NOT BOC - Parity - Timing 1 [- Stop] [- Feeder 1] [- Sequence Control] | HEFTER SI4200/4400 |
| PFE Automailer 2-3 | Start - Insert [- Parity] - 3 Feeder Bits - Sequenz Control | PFE_AUTOMAILER_2_3 |
| PitneyBowes Basic | Start - Safety - NOT EOC - NOT BOC - Parity - Timing 1 | PITNEYBOWES_BASIC |
| PitneyBowes Sequenz | Start - Safety - NOT EOC - NOT BOC - Parity -Timing 1 [[[- Feeder 1] [- Feeder 2]] - Stapling - Timing 2] [- Sequence control - Timing 3] | PITNEYBOWES_SEQUENZ |
| Francotyp | Start - Insert - Stopp because of too many pages [- 2 Feeder Bits] [- Sequence Control] [- Parity] - Stopp | FRANCOTYP |
| Kern | Start - Insert - Move Out - 4 Sequence Control Bits - 2 Match Bits [- Safety] | Kern |
| Neopost 2 row reading | Collect/Insert [- Sequence Control] [- Parity] | Neopost 2 row |
Once OMR is enabled, the following ELP keys are searched for in every activated Section.
| OMR_Enabled | Needs to be turned ON for OMR support |
| OMR_Position | X#,Y#,Orientation#[,x#] Defines the position of the top left corner of the OMR barcode, when printed in standard print direction. The X and Y entries are in mm and separated by a comma. As a 3rd comma separated value, the barcode printing orientation can be entered in 90 degree steps: 0, 90, 180 and 270. The printing position is then still top left, but rotated! The optional second X position is for the devices who need 2 OMR mark columns. |
| OMR_Type | See table above |
| OMR_MaxCollectPages | Defines the maximum possible pages to be inserted into an envelope. Once this amount is reached the insertion command is performed. |
| OMR_LineHeight | Height of the OMR barcode line in mm; Default 7 mm, 1 inch is 24.5 mm |
| OMR_LineWidth | Length of the OMR barcode line in mm; Default 0.5 mm, 1 inch is 24.5 mm |
| OMR_LineDistance | Distance in mm from one OMR mark to the next; Default 4,23 mm 1 inch is 24.5 mm |
| OMR_CollectJobs | This key enables the paper sequence control mechanism, for several print jobs. See below for further details. Default OFF, for Hefter_Sequenz needs to be turned on, ignored for Pritney Bowes. |
| OMR_PrintOnPageSide | May only be used in duplex printing data streams in order to put the marks only on the front or back page. 1 front page only 2 back page only 0 all pages Notes: Should be only triggered for duplex data streams, see last example below. Used on the back page, then make sure that always an odd amount of print pages (sides) are printed. |
| OMR_UseReadPageCounter | Provides a second method to put the insertion mark on the LAST(!) page. Through parsing the data stream into ELP, the amount of pages have to be counted. And the OMR insertion mark is automatically added on the last page. If the key OMR_PrintOnPageSide is used with front side, that the insertion command is put on the last front page. See last example in this chapter. This method is only applicable if each job is a single letter invoice etc. If this method is used, then PREPARSING=ON needs to be set in rule Global and the OMR function needs to be triggered by a SEARCH_ or TRIGGER_ activated rule. |
In addition the following commands are available for the OMR specifications where applicable:
| OMR_SequenceControl |
This key is used to enable an OMR page counting. There are 5 possible entries: 2 (1 bit), 4 (2 bits), 8 (3 bits) 16 and 32 (5bits). For each print job the page number 0 is the startup number, unless the key OMR_COLLECTJOBS is turned on. |
| OMR_Parity | If this key is used and turned on, ELP adds a parity bar right before the stop bar. In this case, the amount of printed bars will always be even. PitneyBowes and PFE_AUTOMAILER_2_3 are automatically turned on and any provided value in the ini-file is ignored. |
| OMR_CollectBar | Toggles if the collect bar is a bar or a space. Default is turned OFF and the feeder command is interpreted as a bar. Turned ON, the collect signal is a bar on second place, and no bar for feeding into the envelope. |
| OMR_AddMoveOut | (Stielow) Turned on, adds the Move Out stroke on all(!) pages, meaning that the so marked pages are not inserted in the envelope but moved out to the exit tray. Sets variable #OMR_ADDMOVEOUT# |
| OMR_Pitney_Flip_EOC_BOC | Turned on, ELP inverts the lines 3 and 4, EOC and BOC. Depending upon the paper output in the printing device, this key is maybe needed in conjunction with the OMR_Pitney_ReverseMode. |
| OMR_Pitney_ReverseMode | (Pitney sequence and Basic, Hefter 4200,4400) reverse the EOC and BOC insert mark, it is set on all pages except the one which triggers the envelope insertion |
| OMR_SafetyLine | Turned on, the OMR for Kern will add the safety line at the end of the barcode. See variable #OMR_SAFETYLINE# |
In addition the following variables can be used for controlling OMR features while processing the jobs. Some of them can be set by special escape esequences within in the document, and they will be resetted after the page is printed, or can be set externally if each job contains only one document.
| #OMR_ADDMOVEOUT# | (Stielow) Turned on, adds the Move Out stoke on all(!) pages, meaning that the so marked pages are not inserted in the envelope but moved out to the exit tray. Therefor the variable #OMR_ADDMOVEOUT# needs to be set to 1, most likely using an OutSearch key. Once the variable is set, they are used for the complete job, or until the variable is set to 0 again! If needed, split mail merge documents. For example: [Global] PreParsing=ON [Move out more then 8 pages] Trigger_Binary=1 Trigger_Variable=#PREPARSEPAGECOUNT#>8 Variable=#OMR_ADDMOVEOUT#:1 |
| #OMR_ADDONFEEDERBITS# | Integer value of how many feeder for fixed addon documents are available, max 5 are allowed. Every feeder reflects one stroke. The variable #OMR_ADDONFEEDERBITS# defines if and from which feeder is drawn. The content of the variable is the feeder number multiplied by 2. The first feeder is then 1, the second 2, the third 4, 8 and 16. If for example 2 page from tray 2 and 4 needs to be drawn the variable value has to be 2 + 8 -> 16. Note: Hefter SI 2200/SSI2250 small and full support currently only one feeder. So if this variable is set to 1 or up, the feeder line is inserted and if next variable set, the line is drawn on the insertion page. |
| #OMR_PFE_SELECTFEED# | The variable defines if the mark for select feed needs to be printed: variable 1, 2 or 3 is possible. The marks will be not printed (even no space steps) when the value is negative. By default they are printed. To turn it off enter the following key into the ini-file rule GLOBAL: Variable=#OMR_PFE_SELECTFEED#:-1. To turn it on set the variable. To set it either use the OutSearch method or the new ELP PCL5 sequence Esc)s-989Z for Feeder 1, Esc)s-988Z for Feeder 2 and Esc)s-987Z for Feeder 3 / stapling For Francotyp devices use -1 to ignore the feeder lines. |
| #OMR_NOOMRONTHISPAGE | This variable set on the actual page while writing out, indicates ELP to NOT print the marks. The variable can be set as well by using this ELP special escape sequence: Esc)s-986Z. It is used for example if you print the first page in duplex and the remaining pages in simples, so the OMR marks are NOT printed for this example on the second page. ELP_Command=C1:2F25986; Another way is simply to used search and add / replace: [No OMR on this back page] Search_Windows_New=terms and conditions Add_Binary=\x1B)s-986Z ReadOnlySearchKeys=ON |
| #OMR_PFE_DIVERT# | The variable defines if the job needs to be send to a divert bin. This marks must come on the first page. The 3 binary marks must be set according to PFEs definition with the value from 0 to 7. |
Additional variables for using Hefter SI 2200 and SI 2250, Pitney Bowes Sequence and Hefter SI 3300 and SI 3500: Same way desribed as above. Special marks will be placed only on the page with the inserter (Group end) mark.
| #OMR_DONTCLOSE# |
If this variable is set as any non-zero value, the stroke will be set on the page with the insertion command. If it is on the first page then the command needs to be set on the first page, if it is on the last page, you have the full document to set it. |
| #OMR_PFE_SELECTFEED# | Same as above, any non-zero value will draw a page from the feeder |
| #OMR_ADDMOVEOUT# | Same as above, set as well only on the insertion / group end page. |
As indicated above, there are two modes for printing OMR barcodes:
-
Within one huge print job, then do not use the key OMR_CollectJobs
-
One job after the other, but all jobs are collected and then moved over to the inserter. For this case use the key OMR_CollectJobs!
For the second method ensure that nobody else prints a job in between, or, if doing so, that this job is not printed through the OMR enabled queue AND of course prints to another output tray. Otherwise the inserter will stop when a page without OMR codes sneaked between.
Once the key OMR_CollectJobs is used, ELP will store after each print job the actual sequence control number of the last page into a file named like this: #PRINTERNAME#.OMR in the Workpath folder (default: C:\ProgramData\Welp). The variable #PRNTERNAME# of course is resolved with the name of the printer where the OMR marks are printed
You may also use the ELP_Command R#; for generating copies of each page. You even may insert different forms etc. The routine will handle to put the insertion command on the last page of the last copy. Never use ELP_Command K#;
VERY IMPORTANT when using OMR codes in collection job mode:
-
Never activate different types of OMR codes for one queue, unless you do not use the key OMR_CollectJobs .
-
Once the inserter is finished with a complete staple of paper and if the machine needs to start always with sequence count of zero, do this:
Ensure, that for the next job the OMR page counter is set to zero! This can be done by erasing the file #PRINTERNAME#.omr in the Workpath folder (default: C:\ProgramData\Welp). To automate this, you may write a simple batch file, which removes that file. The content of that batch file is most likely this:
del c:\ProgramData\welp\#PRINTERNAME#.omr
In order to perform such a command, use for example notepad, type the command in the first line, and store it in a filename with the ending .bat instead of .txt. Then you may generate a link to that file on your desktop and every time the file needs to be erased, simply double click on the link icon.
Of course this file needs to be erased as well every time your envelope inserter device is powered on. But ELP itself is deleting it, just in case the stored value would have been zero.
The Variables #OMR_PFE_SELECTFEED#, #OMR_PFE_DIVERT#, #OMR_OUTTRAY#, #OMR_ADDMOVEOUT#, #OMR_DONTCLOSE# and #OMR_ADDONFEEDERBITS# can be used on a document level. Once set for the job, they will be used to add the related function on the actual page / last page with the insertion mark. They are all set back to zero after being used.
Finally there is a way to NOT print the OMR marks on certain pages. For example if only the first page is duplex and the remaining pages are simplex, then do not print the marks on the second (back) page. See Variable #OMR_NOOMRONTHISPAGE# in table above.
; Rule Global
[Global]
; calculates while reading the data stream the amount of pages
Variable=#OMR_PFE_SELECTFEED#:0
So the feeder bits will be always added to the bar list, even on the first pages, where they are not really needed. On Pitney/Hefter, they will be added only as bars on the pages with the insertion mark (last one), on all other ones they are moved as blanks
This results into 2 ways of using them:
-
[If less then 3 pages add a sheet from the feeder]
; Note: PreParsing must be set ON in the rule GLOBAL
Trigger_Binary=1
Trigger_Variable=#PREPARSEPAGECOUNT#<3; For Francotyp 0,1,2,3 is possible.
Variable=#OMR_PFE_SELECTFEED#:1
-
[Add on all letters the 2 pages from feeder]
; normally this can be found on all windows based stream on top of any page
OutSearch_Binary=\x1B&l
Variable=#OMR_PFE_SELECTFEED#:3
Note: Outsearch method will only work, if the pages contains more than 2 kb of data.
Another method is to add the ELP special escape sequences in the data stream for drawing selective papers: Esc)s-989Z for Tray 1 and Esc)s-988Z for Tray 2.
[Add after every letter from envelope feeder tray 2]
; just we found partnumber XXXX on the invoice
Search_Windows_New=XXXX
Add_Binary=\x1B)s-998Z
ReadOnlySearchkeys=ON<>
[Add after every letter from envelope feeder tray 1]
; just we found partnumber YYYY on the invoice
Search_Windows_New=YYYY
Add_Binary=\x1B)s-989Z
ReadOnlySearchkeys=ON
If this method is also not possible, the job needs to be split
[NameOfPrinterQueue]
; For every print job, coming through the queue "NameOfPrinterQueue"
; the OMR function is turned on!
OMR_ENABLED=ON
; The top left corner of the OMR Barcode is 40 mm from top and 50 mm
; from the left page margin. The 0 indicates, that the default
; printing direction is used:
OMR_POSITION=40,50,0
; Enable Parity checking to enhance the readability safety
OMR_PARITY=ON
; use two bits for OMR the page numbering
OMR_SEQUENCECONTROL=4
[Search Page which needs to get the envelope feeding signal]
; the datastream does not contain the trigger sequence on every last page,
; ELP Searched for a unique word on the last page and
SEARCH_WINDOWS=MwSt. Betrag
; add the trigger right behind.
ADD_BINARY=\x1B)s-990Z
ReadOnlySearchKeys=ON
Sometimes special jobs need to be sent to different output queues, e.g. for postal settings like less and more then 3 pages or local country and foreign letters. In conjunction with the sequence control, ELP needs to have a sequence counter not only for the device but also for the outtray. In this case please define the variable: #OMR_OUTTRAY# before the OMR section is evaluated.
If that variable is defined, ELP will add its content to the final #PRINTERNAME#.omr file name. So it is unique for that case.
Example: If the queue name is called OMR and the content of the variable #OMR_OUTTRAY# is tray1 then the file name for the last sequence control number in the Workpath folder (default: C:\ProgramData\Welp) is OMR.OMR_tray1.
[Global]
Preparsing=ON
ELP=ON
; ... Other keys in global...
ELP_Command=C1:1M8;
; Default outtray is the tray 8
Variable=#OMR_OUTTRAY#:tray8
[search for a letter to foreign countries]
Search_WindowsNew=!Foreign!
ELP_Command=C1:1M6;
Variable=#OMR_OUTTRAY#:tray6
[OMR marks]
Trigger_Binary=1
OMR_CollectJobs=ON
OMR_SequenceControl=ON
OMR_Enabled=ON
OMR....
Related articles: OMR set menu, Full OMR Examples, Postal optimization and OMR marking