Sometimes data streams need to be collected and printed in one shot, that no other data stream may appear in between. Like most cases, ELP offers several ways to do this, of course depending upon your needs.
-
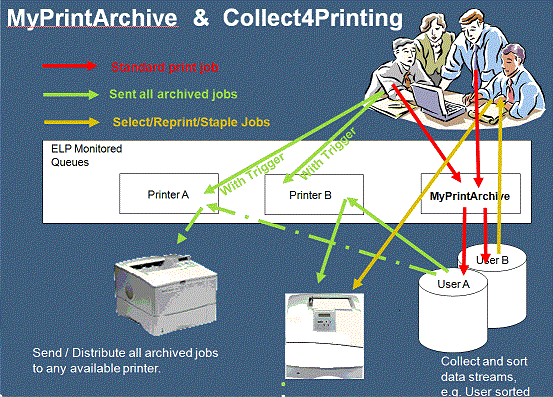
MyPrintArchive: Store your print jobs into your personal folder, for archiving, reprinting etc.
-
Collect4Printing: Send the jobs on request in one shot to a predefined printer/MFP, so no other jobs can be printed in between
-
The Q/A document gives another example, where the jobs are printed x minutes after the last one arrived.
1. MyPrintArchive (see also for that example in the Self-training)
;This example can easily be configured by setting up a new rule/section and once arrived in the Rule assistant select the "Set Archive" button.
[When the word confidential is found]
Search_Windows_New=confidential
; store the job into the user specific directory
OutArchiveDir=#ELP_FORMS_PATH#archive\#USERNAME#;#PRINTDOCNAME#_#DATESERIAL#
; maybe only in PDF format
PDF_Mode=20
; If ELP generates more then one copy, then just the first one is needed
OutArchiveOnlyOneCopy=ON
; Delete the job after 30 days.
ArchiveDays=30
All the jobs can now be reprinted using the Archive Tab or be further processed by another archive system or can be accessed by PPadmin's archive reprint tool on a normal user PC or on a Network drive
2. Collect for Printing Version 1:
In the first step all Data streams are per default collected in an archive directory. After a special trigger expression is found in the actual data stream all jobs are printed and erased. This trigger expression could be easily send to the printer for example using a batch command, which print a predefined text file, containing the trigger expression.
Just two small rules are needed to automatically collect user based all jobs and send them with just one click to any printer/MFP.
[Collect4Printing]
; All jobs from every user are printed through this named queue which has the assigned port: NUL
; Store file to archive directory, coding the user name and time
OutArchiveDir=ELP_FORMS_PATH#archive\#USERNAME#;#DATESERIAL#
; If Print files are older then 5 days erase them
ArchiveDays=5
; This is all what is needed to be done for jobs to this queue
Exit=ON
[Print all]
; Whenever in any of the other activated queues a job with this content arrives:
Trigger_Binary=!PrintAll!
; All stored jobs are inserted at actual jobs end
InsertPrintFilesAtJobEnd=#ELP_FORMS_PATH#archive\#USERNAME#\*.*
; and the trigger job is not printed
KillJob=ON
All you need now is a trigger job for printing the stored jobs. Therefore create maybe on a common network drive a file called Collect4Print.bat with the content:
echo "Collect4Printing: !PrintAll! (c)stethos" > \\###.###.###.###\PrinterShareName
####.###.###.### is the IP Address of your print server.
Now whnever a user double clicks on that batch file, the trigger job is sent to the ELP activated queue. Knoweing the user name will trigger the second rule and here we go.
Tip:
-
Instead of sending all files, they can be grouped, for example if all jobs with invoice start inv... and delivery note with del... The rule action could look like this:
InsertPrintFilesAtJobEnd=#ELP_FORMS_PATH#archive\#USERNAME#\inv*.*
InsertPrintFilesAtJobEnd=#ELP_FORMS_PATH#archive\#USERNAME#\del*.*
-
You also can create several batch files for different directories, file names or printers.
-
The provided MyPrintArchive.ini does the same as described above, but using only one queue. Every job sent to any queue will be stored in the same directory, and when the trigger jobs arrives, all stored jobs are sent to the trigger job receiving queue. Therefore the queue port is a real printer address and NOT NUL.
-
the Q/A document gives an other example, where the jobs are printed x minutes after the last one did arrive.
-
All the jobs can also be reprinted using the Archive Tab or be further processed by another archive system or can be accessed by PPadmin's archive reprint tool on a normal user PC or on a Network drive
3. Collect for Printing Version 2:
The exact same functionality as above, only that every job to every queue is archived, if the print trigger is NOT found. May save one license
[Collect Data Streams]
; Search this trigger in the data stream
Trigger_Windows=MyPrintTrigger
; If found add and erase all files from archive named CollectedStream*.*
InsertPrintFilesAtJobEnd=d:\archive\CollectedStream*.*
; If not found perform the "Otherwise Store" section
ElseTriggerActivateSection=Otherwise Store
[Otherwise Store]
; This section is only called, if the trigger is not found
; Do not print
NoPrinting=ON
; Instead collect all jobs and name the storage files
; File names are: CollectedStream, CollectedStream_1, CollectedStream_2, ...
OutArchiveDir=d:\archive;CollectedStream
If you add those two sections in the convert.ini file, all jobs arriving in all activated queues are stored until the trigger is found.
What happens above:
After ELP analyzed the data stream, and the word "MyPrintTrigger" was not found, in section "Collect Data Streams" the "ElseTriggerActivateSection" key is activated, and therefore the section "Otherwise Store" performed. The archive files are named like: CollectedStream, CollectedStream_1, CollectedStream_2 ... and are stored to d:\archive (maybe add a time variable to get them also in the time lined order)
But if the trigger word "MyPrintTrigger" is found, all in the archive directory stored files named CollectedStream*.* are inserted at the end of the current job.
Important: Currently each stored file is read in one shot to the memory of the PC. Be sure that the amount of memory fits to your needs.
The PPAdmin Archive Tab can be used to reprint one or several jobs in a predefined order and also generating X copies.
All Data streams are per default collected in the first step in an archive directory. After a special trigger expression is found in the actual data stream all jobs are printed and erased. This trigger expression could be easily sent to the printer for example using a batch command, which print a predefined text file, containing the trigger expression.
[GLOBAL]
; This Variable contains the name of the Queue that will print all jobs together
Variable=#ELPTEST#:ELPTEST2
[Drucke_alles]
; Search the String from the release file, that will print all documents of the User
Search_Binary=!!!PrintAll!!!
; Do not print the release file
KillJob=ON
; Call CMD and give the program the needed Variables
Call="#ELP_FORMS_PATH#Processfiles.bat" "#ELP_FORMS_PATH#" "archive\#USERNAME#\*.prn" "#ELPTEST#";OFF
Exit=ON
[Archiv]
; This String has to be in every document that you want to archive
Search_Binary=@PJL COMMENT MS PCLXL NT Driver
; Speeds up the process
Search_Only_Once=ON
TIFF_ARGUMENTS=-p1 -*s3 -!e -!m -$n
PDF_MODE=0
ArchiveExt=prn
; This is the path of the archive
OutArchiveDir=#ELP_FORMS_PATH#Archive\#USERNAME#;#PRINTDOCNAME#_#DATESERIAL#
; Do not print the job
NoPrinting=ON
[Processfiles.bat]
rem Debug
echo "ELP formspath PATH: " %1 >> "c:\TEMP\BATCH_Log.txt"
echo "ArchivPath " %2 >> "c:\TEMP\BATCH_Log.txt"
echo "Zieldrucker " %3 >> "c:\TEMP\BATCH_Log.txt"
CD /D %1
rem give out every single file
FOR %%i in (%1%2) do call %1PrintDel.bat "%%i" %3
[PrintDel.bat]
rem Debug
echo "Archive File: " %1 >> "c:\TEMP\BATCH_Log2.txt"
echo "Zieldrucker : " %2 >> "c:\TEMP\BATCH_Log2.txt"
rem Print everything that is in the User folder
copy /b %1 "\\127.0.0.1\%2" >> "c:\TEMP\BATCH_Log2.txt"
rem Delete file
del /Q "%1"
Setup a new queue and set the time requirements in the Queue properties -> enhanced (Erweitert). In order to give all other printer a higher priority, set all the other queues to a higher priority.
[Search all IE data streams]
; See in an example print file, how your driver tags IE jobs
Search_Binary="@PJL JOB NAME"http://"
; Redirect the data stream to another queue
OutPort=\\127.0.0.1\PrinterShareName
; Do not print this stream
NoPrinting=ON
5. Collect 2 different jobs, print then into an order and staple them together
This little more complex scenario is from a client who first prints delivery notes and then the invoices. The goal was to print and archive the delivery notes, so that they can be attached to the finally printed invoice.
This example assumes, that the jobs come singularized, otherwise you may have first to split them, the delivery notes job directly into an archive, and the invoices to a queue, which inserts in the second run to each invoice the delivery note.
[Global]
; set the variable for the document number which is listed on the invoice and delivery note
Variable=#MyInternalProessNumber#:0
[read the number out of the data stream]
Search_Windows_New=ID:
StoreNextWordToIntVariable=#MyInternalProessNumber#
ReadOnlySearchKeys=ON
[A delivery note?]
Trigger_Windows_New=DeliveryNo:
; and the secondary trigger is also true:
Trigger_Variable=#MyInternalProessNumber#>0
; then print and store the file under the number
OutArchiveDir=#ELP_FORMS_PATH#archive\Delivery;#MyInternalProessNumber#.prn
; just in case you use here an ELP_Command for having more copies
OutArchiveOnlyOneCopy=ON
; also remove the PJL part and reset sequences, that the jobs finally can be stapled together
EraseAllResetEscE=ON
EraseAllPJL=ON
; nothing more to do
Exit=ON
[An invoice note?]
Trigger_Windows_New=InvoiceNo:
; and the secondary trigger is also true:
Trigger_Variable=#MyInternalProessNumber#>0
; then insert at job end the previous stored file
InsertPrintFilesAtJobEnd=#ELP_FORMS_PATH#archive\Delivery\#MyInternalProessNumber#.prn
; also remove here the PJL part and reset sequences, that the jobs finally can be stapled together
EraseAllResetEscE=ON
EraseAllPJL=ON
; but add now the stapling all together command
ELP_Command=ET;T200;
Notes:
-
We have implementations where more then just 2 documents are collected and even some documents may never be there, as they are not needed
-
If you need several copies for the invoice as well, which should not be stapled, just send the incoming stream to another queue doing this.
Finally, if you miss an example get in contact with the local distributor listed in the About box of the License Tab.
Related articles: Archiving, Distribute data streams