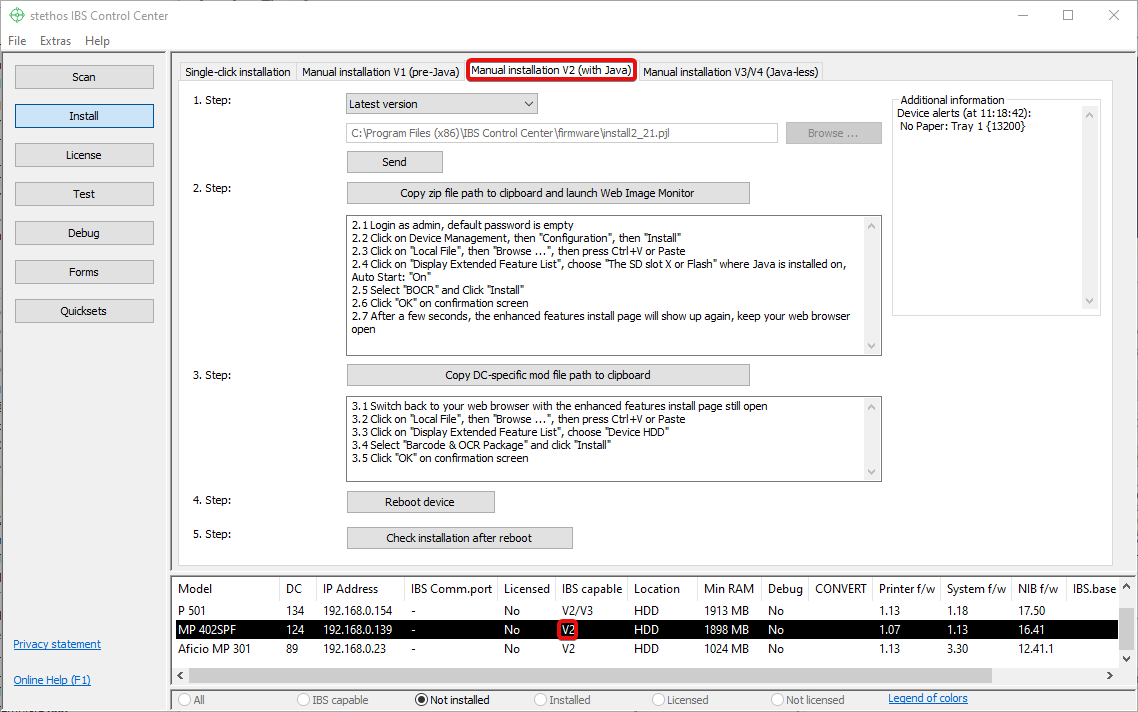
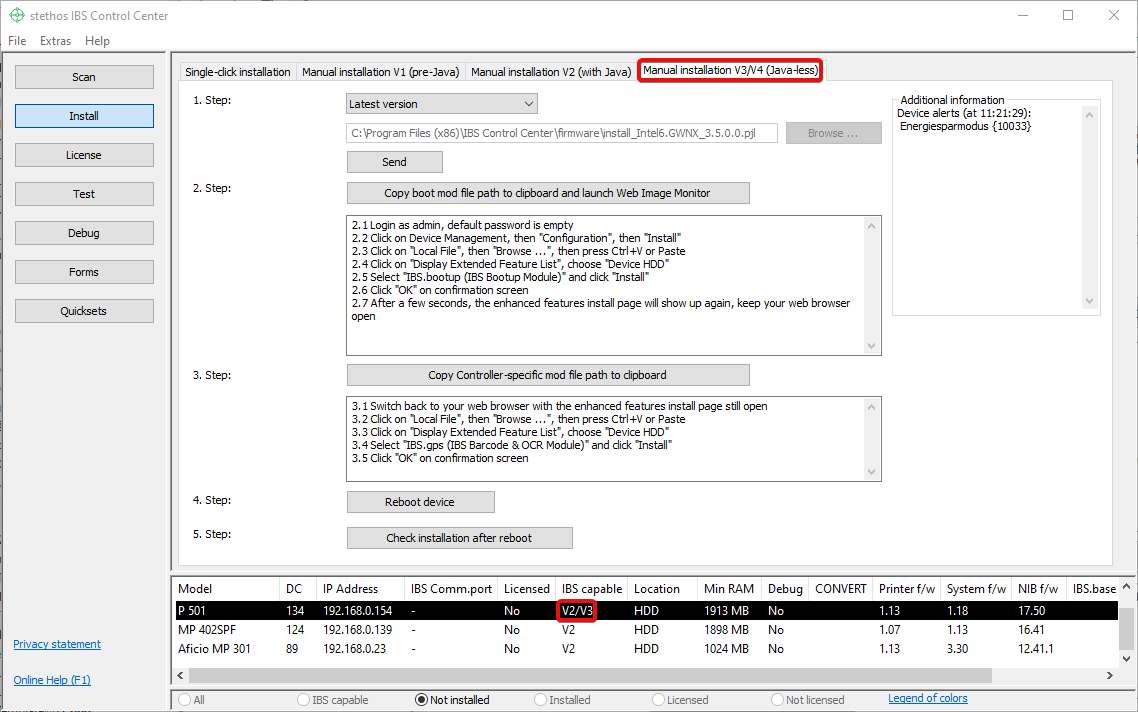
The first step is to install IBS (Intelligent Barcode Solution) on your device. Once you Scanned the network for your printers select the install button.
The device table of the install menu shows only the devices, which
- had been found during the network scan and
- are currently not running IBS and
- can be IBS enabled.
Is a certain device missing from the table, please check the device and make sure that
- it is powered on and
- be sure IBS is not installed already.
After the device was powered on, search again for it using the Scan menu.
IBS can be installed easily using the Single-Click installer. You can switch between the classic and fast installation method by selecting the one or other tab:
Note: Installing IBS V2 will install an additional IBS Java component, so make sure that the Java VM is up and running in the device.
This web page describes the manual installation method. Note that this manual method requires the Diprint protocol all the time. If possible we highly recommend to use the Single-Click Installer within IBS CC which is described here. The latter also supports other protocols like LPR or IPPS for the installation of IBS.
Select the device from the table which you like to install IBS on. After that select one of the two Manual installation Tabs (V2 or V4) which the device is capable off:
1. First tab for V2 or V2/V4 compatible device (Java VM must be up and running). For V2/V4 devices we recommend to go for the third installation method which means that the Java-less version of IBS is installed:

2. Second tab for V2/V4 or V4 compatible device:

Important: Follow each single step and sub-step, otherwise the installation might fail. If you decide to select "Custom" in the first step then a wrong selection of the files can lead into an unwanted state of your device. So handle this selection with care!
Notes:
- If the device is not online you will get an offline notification. More details here: IBS CC Offline message.
- V2 devices can have Java on an internal Flash memory board or an external SD Card. Make sure that the Java (SDK/J) file is installed on the same location where the Java/VM is started from.
- V4 devices must have all files installed on the suitable permanent storage (HDD, SSD or eMMC)
- If you would like to see the result of this communication, turn on in the File -> Settings "General Settings" menu the function "Show device configuration in install menu" ON. The information will be displayed in the top right corner of the install window.
- When selecting a new device, all available special installation notes will automatically be displayed first as a pop window and second in the Install window lower right hand corner.
- Once the printer has been fully rebooted it's recommended to wait for approx. 2 minutes and then you should check for a successful installation by clicking on the "Check installation after reboot" button. This option has the side effect, that the device is automatically removed from the table in case of a successful installation.
If this was performed too early at that time the device was not yet online the device might get removed from the device table. Return to the Scan menu and scan again. Then continue with the Test menu.
Devices which are supported
The simplest way to obtain all of the information pertaining to the supported devices is available in the Extras Menu option Supported Devices.
Please note that newer version of IBS CC most likely do support also new devices. Their for in order to find out whether a specific device is supported by IBS please use the links from below. It is recommended to use the Ctrl+F (Find-) function of your browser and search for the printer number, e.g. 1060.
List of all supported Ricoh devices
List of all supported NRG devices
List of all supported Infotec devices
List of all supported Lanier EU devices
List of all supported Lanier US devices
List of all supported Gestetner US devices
Please use W-ELP for supporting any other PCL5 printer or MFP device.
 DE
DE  EN
EN 