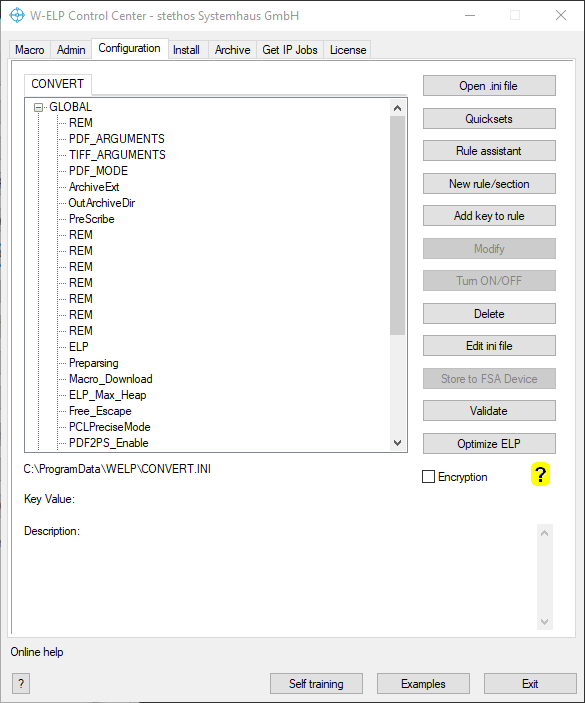
This tab is used to tell ELP what to do, in other words to generate the process rules. ELP provides more than 350 different ELP command keys and additionally about 50 ELP_Commands for forms and printer functionality management. The tab gives access to all keys. In order to make things easier, the Rule Assistant was developed for quick implementation of 65% of all application needs with just a single click.
Even for non Windows users (Unix, Linux, AIX etc.) it is recommended to use the Windows Control Center tool in order to administrate the needed rules, test them, and transfer them later to the non Windows platform.
Before starting with the explanation what you can do with the above menu, it is wise to understand the possibilities which ELP offers by triggers and rules. Theory of ELP rules activation.
The content of the current loaded INI file is listed in the left window. The full path to that displayed file is listed in the bottom field. If this file is not the same as the mainly executed configuration file on ELP process start (defined in the Admin tab) the Control Center will give you a warning at start up.
Each item in the left-hand tree reflects one unique rule/section. You may open the rule/section and have a look at the associated keys to that rule. A rule is marked when the cursor is set on the name if the rule or on any command key within the rule. Changes can be done either by right clicking on the key or rule name, or by marking the item and selecting one of the buttons on the right. The value and the description of any marked key is displayed below the window.
Some rules/sections are executed by default for every job (e.g. the rule GLOBAL or rule with the queue/user name). Using these sections there is no need to define any trigger keys. But usually most rules are executed by Search_xxx or Trigger_xxx keys, which analyze the data stream and perform actions if the item was found.
| Quicksets | Offer a small collection of preset ELP functional settings, like insertion of T&Cs or Emulations. |
| Rule assistant | The rule assistant provides easy access to the most used implementations, like Archiving, Accounting, Forms and Printer Management, OMR Marks, Emulations etc |
| New rule/section | This button adds a new rule with a new name and a new functionality to the currently displayed INI file. |
| Add key to rule | This button adds a new functionality to the marked rule in the currently displayed INI file |
| Delete | The left-hand highlighted ELP key is erased, even if it is a complete section |
| Modify | This option is turned on, if the marked key is of type string or integer. A new window pop up allows you to enter any information. Sometimes you may need to enter non-displayable characters. This can be done by using the hex notation. For the key ELP_COMMAND the ELP command generator is automatically called, so it is very easy to modify the common rules for reprinting etc. |
| Turn ON/OFF | Flips the setting of any Boolean ELP key. |
| Store to flash device | This function is only enabled if the Control Center runs in DIMM mode. It can be used to download the configuration file on an Ricoh printer, which runs ELP as firmware extension. The software is smart enough to detect any linked .ini file (key IniFile) and download them as well. |
| Open .ini file | Sometimes you may need a configuration, which is a little more complex and needs to be spread over several .ini files. Use this button to load any specific .ini file into the editor. |
| Validate | You can validate your ELP configuration by hitting this button and get also useful hints. |
| ? | Online help |
| Optimize ELP | Offers to set or change some of the most speed influencing ELP settings |
| Encryption | Marked, the .ini-File is encrypted and can't be opened with any standard application. Together with the password option this function prevents the configuration from changes by unauthorized users. |
| Current ini file: | Loads the currently loaded, and displays .ini file into the ASCII editor notepad.exe. We recommend to edit those configuration files by hand only for experienced users. Note: The ELP Control Center will not automatically update those external changed files! Load the file again after the external modification, or simply restart the Control Center. |
After installation the following rules are available:
| [GLOBAL] | All command keys in this rule are executed/performed right at the print job start-up. |
| [Trigger Example] | Is used by some of the provided example (MS Word files). |
| [Printer Settings] | If one or even more of those triggers are used in the ini file (Orientation, Page_Size, PaperTray, Printer_Names, Resolution, Simplex_Duplex) in order to trigger upon certain print job settings, but the proper information is missing in the data stream, ELP reads the default "printer" setting out of the section "Printer Settings" of the actual .Ini-File |
If the ELP Control Center is running in DIMM mode, the ini file and all referenced files can be stored to an FSA device by clicking on the button "Download". Note that in that mode only the ELP functionality of the printer internal ELP version is available!
Related articles: New Rule / Section, Add Key to Rule, Rule Assistant
 DE
DE  EN
EN 