 DE
DE  EN
EN This tab offers:
| Activate and deactivate queues | Any locally on the PC/server windows installed queue can be activated and deactivated from the ELP printing process. This is what is described here |
| Fleetmeter | This function collects a lot of information incl. page counter(s) from your network printers (MIB). An easy to use provided additional piece of software can compare two network scans and calculate for each printer the printed amount of pages. |
| Filesender | The Filesender is a stand alone program to monitor as many directories you like and if files appear within, then the sender will take them and send them either into a destination directory and/or to a certain port and/or as an attachment via e-mail. On success, the source files are afterwards deleted. |
| Info About Queue | Opens a sub-window in which you can edit some attributes of the selected queue. |
| Print Jobs | Set values to certain queue related items. After a queue is opened, ELP displays all data streams and they can be deleted or moved and copied to other queues. |
Important: For a Windows Cluster installation, please continue to read here!
After every start of the ELP Control Center and on the first opening of this register, ELP compares all names of any activated queue to the listing in the ini file section: ELP activated Printers. Some HP LaserJet drivers might replace the print processor for all queues using this driver as soon as a new queue is installed with that driver. In other words the installation process of the new queue will deactivate all other ELP queues (using the ELP print processor welpprint) based upon the driver (mostly seen with original HP LaserJetJ printer drivers). On any differences, the software asks to reactivate the queues. If you W-ELP software release if from 2019 then we recommend to use the port monitor instead of the print processor (if possible).
Activation and deactivation of the ELP functionality
The left window lists all installed printer queues which are NOT activated within ELP, the right list shows all queues activated within ELP (as print processor, as transport queue or as port monitor). If a locally installed queue is NOT listed, then please click on the button: "Display all printers".
Once any entry of these two lists is marked, the port and the name of the driver is displayed below the lists. The port will already indicate which technology is used for activation of the queue:
- TQ = the queue is activated as transport queue
- PP = the queue is activated by using the W-ELP print processor welpprint
- PM = the queue is activated by using the W-ELP port monitor
You may now install / uninstall the ELP process, simply by double-clicking on the name, or mark multiple names with shift / ctrl and activate / deactivate with the activated direction key "<<" or ">> PP". Double-clicking activates a queue by replacing its print processor (see ">> PP" in the table below).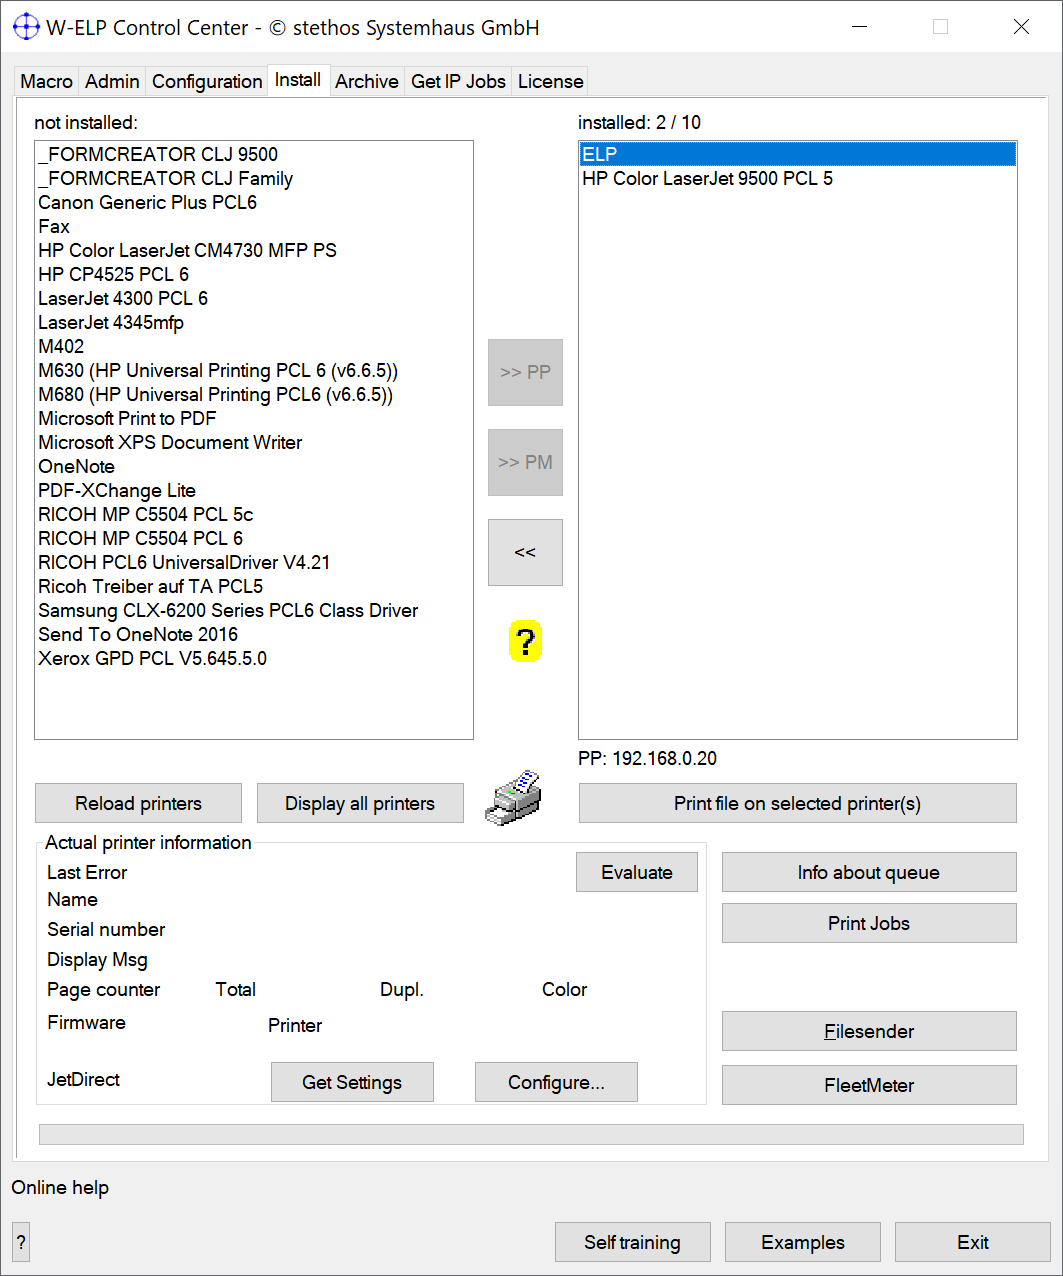
The options of the Install Register Tab are
| >> TQ | TQ = Transport Queue. This button will activate a printer queue as a pure transport queue. This means that upon activation the printer queue´s "Advanced Printing Features" setting will not be altered. Print jobs which are rendered by the locally installed driver will not be parsed by ELP. If the printer queue receives already ready-to-print spool files, e.g. from SAP, it will be processed by ELP. This option is only available if the "Transport queues" checkbox in the tab "Admin" was activated. Please use this feature only when you are advised by stethos to do so. |
| >> PP | PP = Print Processor. This button will activate a printer queue by replacing its print processor and disabling the "Advanced Printing Features". Note that ELP does not interfere at all until a queue is activated. ELP is not a service, so even for activated queues ELP only needs resources as long as the print job is processed. Windows automatically calls the ELP software convert.exe even for the next incoming job, after the queue is activated. |
| >> PM | PM = Port Monitor. This button will activate a printer queue by changing its port monitor. This means that upon activation the printer queue´s "Advanced Printing Features" setting will not be altered. This option is only possible if the printer queue is connected via one standard Microsoft TCP/IP port monitor to the device. If the installation requires to work also with other port monitors from a third party manufacture or Port Pooling is enabled please contact stethos support. Important note: The stethos Port Monitor cascades the existing port monitor by doubling the amount of ports per printer queue. If you need to change the underlying original standard TCP/IP port monitor you have to disable the ELP functionality first and re-enable it once the original port monitor has been changed according your needs. You can review the created port monitors using this registry hive: Computer\HKEY_LOCAL_MACHINE\SYSTEM\CurrentControlSet\Control\Print\Monitors\stethos Enhanced Laser Printing\Ports |
| << | Deactivates the marked queue from the right handed window. The Winprint.dll print processor is activated. |
| Reload printers | If you have modified, deleted or added the printer/queue settings for any device using the windows control panel printer settings, you may reload with this button the latest printer information. |
| Display all printers | By default ELP lists in the available printer window (left) only the queues with certain print processor names (e.g. HP, Lexmark or Ricoh). If some of your print queues are not listed, press this button. If they are still missing, then check if they are installed locally or they are just linked to another print server. Those can't be activated, so they are never listed. If you just test ELP, then you may install a driver. Please use any PCL5 driver or of our recommended drivers. |
| Double click left window | See ">> PP" |
| Double click right window | See "<<" |
| Left Window right click | All four functions are described here. |
| Right Window right click | All four functions are described here as well. |
| Printer symbol | Opens the Windows Printer Management. |
| Print file on selected printer |
Opens a list of print files. One can be selected and is send to the selected queue(s). If queue(s) were selected where the ELP process is not installed then the print file is just sent to the printer without any modification. If queue(s) on the right were selected the job runs fully through the ELP process. You may capture any print file and copy it like described here: debugging function. The file list displays all PCL5 and PRN files of the WELP installation folder and its sub directory forms / or the C:\ProgramData\WELP folder. However you can browse for a custom file and select it for print if needed. Trouble shooting: if the job hangs in the queue with printing, please check the security settings of the queue, registry security of the HKLM - software - [WowNode6432] - WELP and - forms paths, and the WELP installation directory and sub-directory. Best is that EVERYONE has access and modification rights. |
| Evaluate | If the selected queue is printing to an IP address, this button tries to read out the HP MIBs for the viewed items in that frame. |
| Configure | Tries to open the printers WEB page in your Microsoft Internet Explorer |
| Get setting | Reads back the JetDirect network card configuration of an HP printer |
| Info About Queue | Opens a sub-window in which you can edit some attributes of the selected queue. |
| Print Queue Management | Opens a Print Job Management window for the marked printer and displays all print jobs. Compared to the original Windows queue, some more items are displayed and the jobs can be moved to other queues. |
How to (temporarily) activate or deactivate multiple or all queues:
Older versions of W-ELP did not have the ability of multiple printer queue selection within the Install Register Tab. Since July 2016 you can use SHIFT and CTRL in order to select more than one or even all printer queues in order to enable or disable the W-ELP functionality.
Related articles: ELP Server/License Change