 DE
DE  EN
EN Introduction
Here is the short list of all available ELP_Commands.
Here is the technical documentation for ELP_Commands.
General Information and User Interface
This most powerful functionality of the software stands for the name of the product: Enhanced Laser Printing (ELP), using an ini file key called ELP_COMMAND. This command can define if needed:
- A banner page or set of banner pages
- Generating a set of copies in various different ways, 111, 222, 333 ... or 123..., 123..., 123...
- Include additional pages, like terms & conditions
- A set of additional pages, like data sheets etc.
- Use any printer functionality like private pin, stapling, punching etc.
The most important commands can be set using a generator build into the Control Center. But also the easy to understand ELP_Command command syntax offers additional data stream manipulations like for every printed page:
- Insert additional forms and pages
- Set the paper path for input and output tray.
- Simplex/Duplex
- Repositioning of print data on page
- Reprint factor
This so called ELP function is by default like the bar code function turned on. If you do not want to use this function and you want to increase the processing speed, toggle the ELP key in the rule GLOBAL to OFF. This has the side effect that the Trigger_-Keys like Trigger_Binary, Trigger_Windows, Trigger_Text, Trigger_Windows_NEW an Trigger_Text_NEW are no longer performed.
The search commands are applied on the whole data stream. The associated keys like Erase_, Add_ etc. are also evaluated and if found performed on the whole data stream. However, evaluation the remaining keys, like IniFile, PassThrough etc. are only supported up to the point of time, when the first Byte is written out. This can be very soon in case ELP=OFF (ELP function is turned off) or in AP_ELP boxes or printer build-in firmware extensions, the limit there, even with ELP=ON, is as small as about 2 MB. If in those cases you want to evaluate all available keys within searched rules, the key: ProcessSearchKeys needs to be used and set to on. But note: It doesn't make any sense to turn any command on, which needs the complete print job. For example Archiving or IN/ OutPort commands are invalid after the first bytes are written out.
Important: The maximum length of the ELP command is 2048 bytes. As the ini file line length is limited to 512 bytes, you need to use the key ELP_Command_Add if a command should be longer than that.
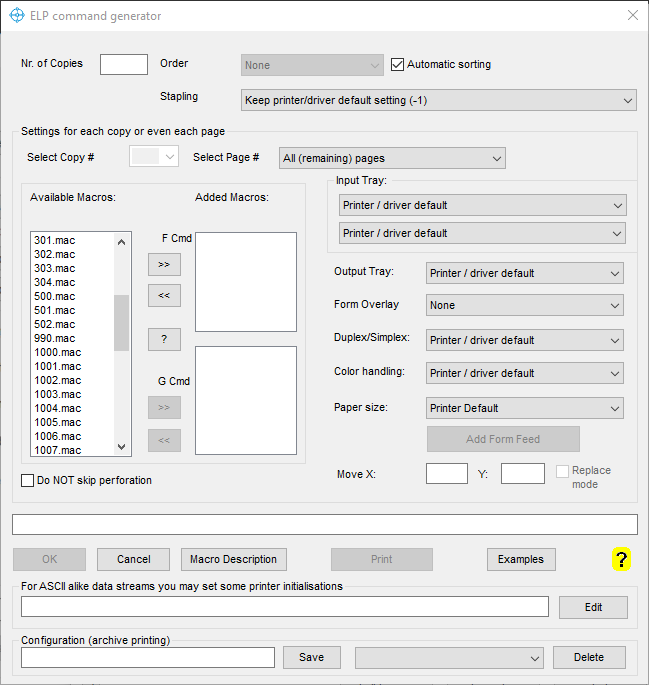
The command generator is called if you double click on the key ELP_Command or for a new rule you set the hook for Forms & Printer Management in the rule assistant.
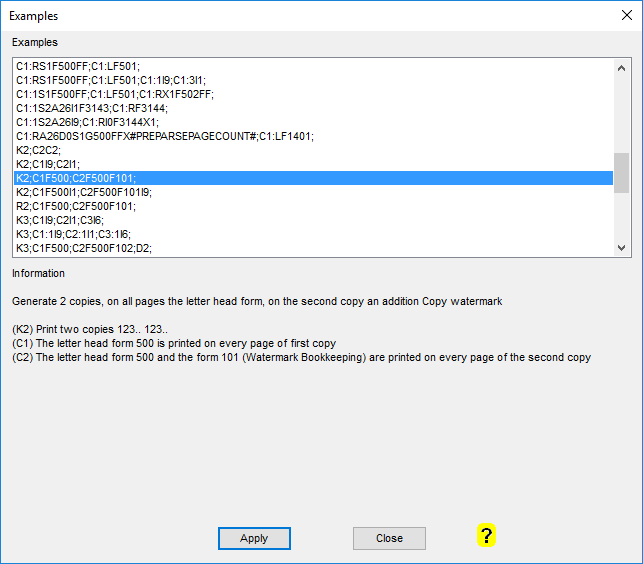
Before starting the explanation about the generator, especially for ELP newcomers, it is recommended to have a look into the provided examples. Simply click the button Examples. A new window opens and gives you access to over 50 predefined ELP_Command sets. Mark any sample and the description of it is displayed. After you have found the closest one for your needs, apply it. The command line then is displayed in the generator. Select OK and return to the main menu. The next job running into that selected rule will perform with the ELP_Command set.
Working with forms, logos, watermarks etc.
How to define your own logos, forms and watermarks is described here. Click on the button "Macro Description" to open a window which lists all available macros. Then mark one and you will get the according description displayed.
There is no limitation of how many forms can be used per page. It is recommended to split letterheads into its components like logo, footer, address window, folder lines etc.
Forms are usually added at the end of the page. This must be indicated through a form feed. Without a form feed no form will be printed. The black and white forms are overlaid, so even they are printed at the end of the page. This is different for colored water marks, or any colored graphics, it is always printed on top. In that case, use instead of the F the G command including the key Preparsing=ON and the variable #PreparsePageCount#, see examples.
As noted before, the generator provides a user interface for the most common used C#-Commands like paper tray or forms selection. Press ? to get a listing of all available ELP_Commands ..
Click on Examples to get a collection of most used configurations.
The provided ELP_Command is analyzed by the ELP process in a very special way, described a little further below.
Whenever changes in the Generator are performed, the ELP_Command field is updated. To invoice the command, press OK and return to the main screen
Examples: Holds list of over 45 ELP_Commands settings including their detailed description. They are selectable by double click and can be modified later using the command line generated. In most cases you may find in the list a pretty close version of your needed forms and printer handling function, based on the provided demo forms, which are ready to be changed by the forms you did generate.
Nr. of copies: Enter your needed number of copies. If you need only one print, the original, then leave the field empty. If you need one copy and one original, enter a 2 in the field. For the future use of this document: the mentioned amount of copies always includes the first copy, the original. If you need more than one copy then the fields Order and select Copy # are there to enter valid data.
The option Order is only available when more than one copy is printed. Single pages mean that every page is printed X times, right away (111 222 333). Collated means, the whole document is printed X times (123 123 123). Note: In collated mode the document needs to be loaded completely into the memory. For Windows or Unix environments, this will work, but certainly not for printer using an AP-ELP box or Ricoh internal ELP version. Here the available memory space may be as little as 1.5 MBytes. If a data stream is larger than the predefined maximum memory usage barrier, then ELP won't be able to reprint jobs collated.
Stapling and punching More than 230 different commands from different printer manufacturers. If the command for your printer is missing, then load the file stapling.ini from the Workpath folder (default: c:\ProgramData\Welp) into any ASCII editor and add the missing stuff. The file content should be more or less self-explaining. Note for professionals: The collated mode will staple every copy together. If you need more than one copy and all copies need to be stapled with one staple together, then use the keys EraseAllPJL and generate with ELP_INIT_Job and ELP_EXIT_Job your own PJL header with stapling PJL.
All remaining commands, are used either by copy, by a specific page in a copy or on all left or right handed pages.
| Select Copy # | Depending on the amount of selected copies in the "Nr of copies field" the field addresses now one specific copy for which the generator has to add a specific rule. |
| Select Page # | All (remaining) pages: All pages for that copy which are not already addressed by a specific page number.
For the first copy this command will generate a C1... ELP command. All left handed pages: For example a form with a page counter can be printed on all left handed pages (back side pages). C1:L... All right handed pages: For example a form with a page counter can be printed on all right handed pages (front side pages). C1:R... Last page: Maybe the last page has to be drawn from a specific paper tray. The key Preparsing has to be turned on in the rule GLOBAL, C1:#PREPARSEPAGECOUNT#..... 1,2...: A special rule has to be set for the provided page number #. C1:1.... For page 1. Notes: The "All (remaining) Pages" command is NOT executed if a specific page is already defined. It is not allowed to use the Duplex command on "All (remaining) Pages", or if you like to print duplex to have on every page an input/output tray or the page size commands. This will lead into simplex printing pages. A C1S1... or C2F101S2... is not a valid command. To print duplex insert the command on page 1 of the document, like C1:1S1F500; |
| Add macros F mode | In the left hand available macros window double click or mark and click on >> to add a macro to the selected copy + page number selection. You may add several macros. If no specific page definition is selected, the form will be printed on all pages. How to add forms. |
| Add macros G mode | The difference compared to F is, that the macro is called at the beginning of the page. Colored forms are there for below the black data. See example Colored Form for further information |
| Remove macros | Select the copy and if needed page definitions and double click on the listed form in the right window or mark and <<. |
| Input tray* | ELP offers 2 methods for drawing a specific page. The method using media types and PCL5 tray numbers. If possible, use always the media type way as: 1. You may anyway need to set media types to trays in order to avoid, that the printer switched paper trays to the wrong type of paper after a tray became empty. 2. You can leave the paper tray setting to the user, who may want to bundle server input trays with the media type with the most needed paper |
| Output Tray* | Select any specific output tray if available, for any printed page. |
| Form Overlay | The named form is not printed automatically on every page, unless another overlay command is issued. |
| Duplex Simplex* | Turn simplex, duplex long side or duplex short side on. |
| Color handling | Tell the printer to print color pages in grey, for example for a specific user, printing from the internet browser. |
| Paper size* | Select your specific paper size, if not already provided in the data stream. |
| Add form feed* | Insert a new empty page after a specific named page. Do not insert that command on all pages, This will result into an endless ELP process, as every inserted page will insert another page. Any new pages increase the page counter by one. So if you like to have the terms and conditions added, then the second page printed will become the third processed page |
| Move X | Adds an offset to the job in portrait X direction; PX will go back to default coordinates, right before any form overlay will happen |
| Move Y | Adds an offset to the job in portrait Y direction. PX will go back to default coordinates, right before any form overlay will happen |
| Do not skip perforation | Turns perforation skip for ASCII files off. If page breaks are not performed by FormFeed, some lines will be missing. |
| ELP_Command field | You may enter any additional ELP_Command, which is not available through the generator by hand. Click on ? or see here for a complete listing of all commands. |
| Edit: (printer Initialization) | To get independent from the printer settings and if a printer initialization is not really applied (No PJL commands etc), then you may use the Edit button to generate one. |
| ? | Displays a list of all available ELP_Commands |
* The best way to set those commands is to set them only on the first page needed. Everything else might cause trouble when duplex printing is enabled. Example: All pages printed in duplex: C1:1S2; This command C1S2; meaning print all pages in duplex will result in simplex printing, as the duplex command does always start on a new paper, so the duplex command on the back side will feed the paper.
ELP Test print If you are working with forms you may want to see the result without printing it. Start your Adobe Acrobat Reader and then click the button. ELP will generate a 3 page document and process it through the complete ELP system. The result stream is displayed. If the reader was NOT started, it is automatically loaded, but you need to close the reader before you can continue to work in the Control Center.
How to setup:
Starting from scratch you can as described below follow the listed steps or simply click on Examples and with some luck you find exact the solution described what you need. Then Apply the Example or:
-
Choose the number of desired copies in the Nr. Of Copies field. One means to print only the original, a 2 means one original and one copy. Some fields will be not selectable, if only one original is printed.
-
If more than one copy is printed enter in the Order field the method, how the pages should come out. Methods are 111 222 333 or 123 123 ...
-
Now select inside the Copy Definition group all the actions ELP should perform.
-
First select a specific copy (1 = original etc.). Then select a specific page inside the copy. It is possible to select different parameters for each copy, each page or for all left/right pages.
-
The available actions include the following possibilities:
-
A macro can be added on the selected page of the copy or the complete copy. Thus it is possible to add a company logo on each printed page of the copy .
-
The input and output trays of specific pages can be chosen.
-
An Overlay macro can be selected. If an Overlay macro is added to a page, the printer uses this macro for all following pages until it is disabled on a page that is printed later.
-
Change the paper handling - With this option it is possible to print specific pages or whole copies in simplex or duplex.
-
A form feed can be added on each specific page.
-
All drop down menus and the macro fields are automatically adjusted, if a different copy number is selected. If no definitions for this kind of copy have been made, the boxes show the Default text and the Added Macros field is empty. All boxes and fields inside the Copy Definition field apply to the selected copy number.
| Macro Description | All available macros/forms are listed. They had been hopefully documented during the generation process. Simply click on one and see. |
| ELP Test Print | A three-page document is sent through the ELP process addressing exactly the currently ELP_Command. Note: It is recommended to start the default PDF viewer before clicking this button, Otherwise the reader needs to be closed before the next test can be performed. |
| Examples | Lists over 50 ELP_Command sets are listed with their description and can be select. |
Data stream initialization
Sometimes ASCII data streams coming without any printer initialization. Whatever is in that field, it will be inserted right at the very beginning of the data stream. Click on Edit to open the PCL Initialization Generator.

Configurations for printing from archive

You can save the actual ELP_Command under a unique name for later usage during printing files out of the archive. This way you can apply your command settings to documents already printed or documents printed in the future which are (maybe in addition to actual printing) stored into an archive.
Just give the configuration a name and click "Save".
To delete a previously created configuration select it on the right and click "Delete".
Additional background information
An ELP_Command is valid for the whole data stream, even if it contains several print jobs. However ELP provides an additional PCL command which turns the ELP functionality through the processing of the data stream temporarily off <Esc>)s-996Z and back to on again <Esc>s996Z. There is also an ini file key called ELP_Command_Active, which deactivates the provided ELP_Command from the beginning of the job. In this case a <Esc>s996Z is needed for activation.
Those commands can be used at any time, but they make only sense between two jobs. If used within a job, most likely the begin page commands from the ELP_Command may already has been performed before the off command <Esc>s-996Z is found. Or the other way around, the top of page commands are not performed, when the command is turned somewhere on the page on.
ELP does offer a fast way to setup commands for printing a specific form on every page, or a bit more specific just on all pages drawn from a predefined paper tray. Those 2 settings can be defined in the macro register.
Related articles: Rule assistant, Add key to rule