 DE
DE  EN
EN 
Active Directory (AD) is a directory service created by Microsoft. Active Directory uses a number of standardized protocols to provide a variety of network services. More Information can be found e.g. in Wikipedia.
ELP can access and retrieve the content of any active directory object or attribute into variables, using 2 methods:
-
If you know the correct path then you may read the information direct, using the key: ADIR_GetVariable
-
A second more comfortable way reading into only one variable back is to use a provided Visual basic script
1. ADIR_GetVariable, reading strings direct into an ELP Variable
The argument of the attribute is the object definition and optional followed by a ! sign and the attribute name. The ELP variable is then named according the name of the attribute but surrounded by #.
ADIR_GetVariable=WinNT://myhostname/InvoicePrinter
reads all items of the printer object (called resources) named InvoicePrinter. If a printer with this name exists, the result variables could be like that:
Variable name Value
#PrinterName# LJ 2300 PS
#Model# HP LaserJet 2300 Series PS
#Datatype# RAW
#PrintProcessor# HPPRNC01
#PrintDevices# IP_192.168.0.24
ADIR_GetVariable=WinNT://myhostname/InvoicePrinter!Model
reads the model key of the printer object named InvoicePrinter.
Variable name Value
#Model# HP LaserJet 2300 Series PS
How to verify if the variables are found:
Set the log_mode=101 in rule GLOBAL and run one print job. After the process is finished click on the button Debug folder within ELP Control Center, Admin Tab and open the Log_file_<date-time-stamp>.txt within the <printqueue folder>. If line feeds are missing use e.g. Notepad++ for better reading.
Any error messages can be found in this file (search for the word Error) and you can find in the last part of the file a listing of all variables.
Note: It is important to turn later the log_mode off (set to zero) as this function will take huge system resources! Even worse if a virus scanner is active.
2. Comfortable reading Active Directory values into ELP variables
Using a Microsoft provided visual basic script. The routine can read up to 19 values. It takes a little more time as the solution above, but as an important benefit, the script searches a named directory and its subdirectory for a names item and if found, reads back up to 19 keys. Usually it is searched for the user details of the user who prints the job. So windows passes in the user name.
To configure ELP for that process, it is recommended to first setup your command line in an DOS window. So you can see direct the positive or negative result.
-
Open a DOS box (Start - Run - CMD) and change into the welp main directory cd c:\programme\welp
-
Type the following command for the script online help:
CScript //Nologo mailSEARCH.vbs /?
-
Type the following command and modify it to your needs:
CScript//Nologo mailSEARCH.vbs "LDAP://cn=Users,dc=stethos,dc=loc" /S:SubTree /P:Mail /C:sAMAccountName=MyUserName
The call does search in the Users container of the domain stethos.loc for the value of the key "Mail" for the user with the "sAMAccountName" name "MyUserName".
Of course you need to adapt your "LDAP://..." Query to your AD settings.
If all works fine, the search does return an ELP variable on the screen:
#MyLDAPVarMail#=The_valid_eMail_Address_of_the_User -
If you need more items of the same directory, add the key names with up to 19
/P: commands: /P:Mail /P:DisplayName
As a result the script lists all entries, for each /P one line. - You can also check if a user is part of a group using the C parameter of the script (C = Criteria). The following call returns the e-mail address only if the user with sAMAccountName "JohnDoe" is a member of the group "PrintStamp":
cscript //Nologo mailsearch.vbs "LDAP://DC=corp,DC=stethos,DC=com" /S:SubTree /P:mail /C:"(&(sAMAccountname=JohnDoe) (memberOf:1.2.840.113556.1.4.1941:=CN=PrintStamp,DC=corp,DC=stethos,DC=com))" /Q
-
For a silent operation add /Q to the command line.
-
There is an additional /O: command for a file generation, but it is probably more flexible to use the DOS shell redirection output command.
- A complete documentation on the parameters can be found on the Microsoft TechNet
Once all works as expected for the command line, it's time to implement the function into ELP rules. As a small limitation, there is only the key CallAtStartUp available to call for the shell script, which must be issued in the rule Global, User- or Printer-named rule.
It is also a 2 step process, first call the script and write an ELP variable file, then second read the variables back into ELP. As the key CallAtStartUp is processed after all the default rules, a second rule is needed to read the created content back.
As an example the user email address and its full display name is read from AD.
1. Step: Add the Visual Basic Script call in the rule global:
CallAtStartUp=cmd /c CScript //Nologo #ELP_PROG_PATH#mailSEARCH.vbs "LDAP://cn=Users,dc=stethos,dc=loc" /S:SubTree /P:Mail /P:DisplayName /C:sAMAccountname=#USERNAME# /Q > "#ELP_FORMS_PATH#AD_#PRINTERNAME#.var" ;OFF
IMPORTANT:
If your installation path includes blanks like "C:\Program Files\WELP" you must use the absolute path and put into doublequotes "":
CallAtStartUp=cmd /c cscript //Nologo "C:\Program Files\WELP\mailsearch.vbs" "LDAP://cn=Users,DC=corp,DC=stethos,DC=com" /S:SubTree /P:Mail /P:DisplayName /C:sAMAccountname=JohnDoe /Q > "C:\ProgramData\WELP\AD_#PRINTERNAME#.var";OFF
cmd /c CScript //Nologo calls the Visual Basic Script Software in a DOS box with the VBS script: #ELP_PROG_PATH#mailSEARCH.vbs using the ELP value #USERNAME# for searching the windows logon name directory: "LDAP://cn=Users,dc=stethos,dc=loc" /S:SubTree /P:Mail /P:DisplayName /C:sAMAccountname=#USERNAME# /Q in quite mode and redirect the output to a new file in the Workpath (e.g. c:\ProgramData\WELP) folder: > "#ELP_FORMS_PATH#AD_#PRINTERNAME#.var"
The ;OFF will prevent ELP to add "" around the replaced variables.
Once running the a job the file AD_QueueName.var is generated in the Workpath folder, e.g. c:\ProgramData\WELP. The content can be like that:
#MyLDAPVarMail#=
#MyLDAPVarDisplayname#=Surname Lastname
2. Step: Read back the variable file to ELP:
Depending if you need the variables more or less before you start reading the job in you may use a searched rule:
[Read back AD variables at the first found character 1]
Search_Binary=1
Variable_File=#ELP_FORMS_PATH#AD_#PRINTERNAME#.var
Search_only_Once=ON
Usually the email rues are set with Triggered rules. In that case simply use this rule, which needs to be defined in front of the email rule!
[Read back AD variables]
Trigger_Binary=1
Variable_File=#ELP_FORMS_PATH#AD_#PRINTERNAME#.var
3. For testing if the variables are set the log_mode=101 in rule Global and run one print job. After the process is finished click on the button Debug folder within ELP Control Center, Admin Tab and open the Log_file_<date-time-stamp>.txt within the <printqueue folder>. If line feeds are missing use e.g. Notepad++ for better reading.
In the last part of the file exists a listing of all ELP variables.
4. The variable #MyLDAPVarMail# is now ready to be used as a static e-mail address for sending out emails. (Rule Assistant - Set email)
Hints:
-
You may set additional variables in the [CallAtStartUp] rule.
-
If several different AD directories needs to be addressed, then call instead of the "cmd /c" method an own developed batch file:
CallAtStartUp=#ELP_FORMS_PATH#MyGetAD.bat #ELP_FORMS_PATH# #USERNAME# "AD_#PRINTERNAME#.var";OFF
The batch file is called with 3 options: The path to the workpath folder, the user name and the ELP variable FILENAME for the results.
Using this batch file will for example generate the same 2 items in the result var file as with 2 /P: commands in above example:
CScript //Nologo %1mailSEARCH.vbs "LDAP://cn=Users,dc=stethos,dc=loc" /S:SubTree /P:Mail /C:sAMAccountname=%2 /Q > "%1%3"
CScript //Nologo %1mailSEARCH.vbs "LDAP://cn=Users,dc=stethos,dc=loc" /S:SubTree /P:DisplayName /C:sAMAccountname=%2 /Q >> "%1%3"
You have seen, in the first line the > will generate the new output file, and in the second call the >> pipe adds the results.
If at process begin not all needed variables are available as they may be collected while reading the data stream, please contact your local distributor for getting help.
3. Getting the e-mail address from the Active Directory´s Global Catalog using Windows PowerShell
Pre-requisites: Make sure that Windows PowerShell and its ActiveDirectory Extensions (usually included in the Windows Remote Server Administration Tools) are installed on the print server:
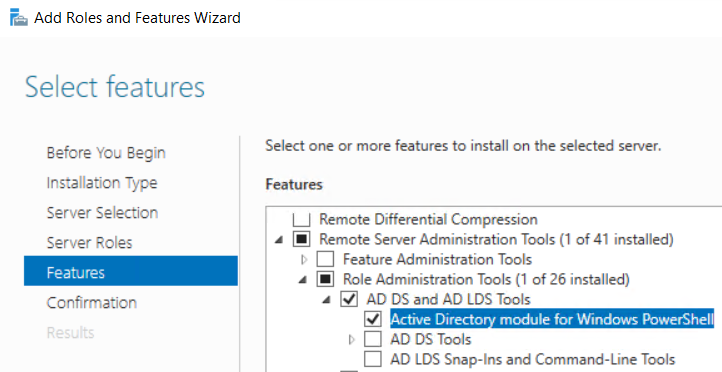
Then follow these steps:
- Create a new text file in the Workpath folder c:\ProgramData\Welp and rename it to "getmail.ps1".
- Edit "getmail.ps1" with a text editor of your choice. Please copy paste the following 7 lines:
param(
[string]$a, [string]$b
)
$mail = (Get-ADUser $a -properties mail).mail
$intro = "#AD_MAIL#="
$final = $intro + $mail
$final | Set-Content -Path $b
Note: this script is called with two parameters: the username and the relative path and file name where the e-mail address will be stored.
Variant 1: Use the print job owner and the Windows PowerShell to retrieve the print job owner´s e-mail address from the Global Catalog.
Now modify your configuration file c:\ProgramData\Welp\convert.ini and add the following sections:
[Call the PowerShell script in to get the e-mail address from the Global Catalog]
Trigger_Binary=1
;=== This call command will do 3 things:
;=== 1. Start the Windows PowerShell and import the Active Diretory module
;=== 2. Set the Execution Policy
;=== 3. Run the getmail.ps1 script with the ELP-internal variable #USERNAME# which is filled with the print job owner
CallNow=cmd /c powershell -command import-module ActiveDirectory | powershell Set-ExecutionPolicy Unrestricted | powershell -command ".\getmail.ps1 #USERNAME# .\tempmail.txt";OFF
[Read variable from file]
Trigger_Binary=1
Variable_File=#ELP_FORMS_PATH#tempmail.txt
If you want to send the print job as PDF document as an e-mail attachment you can add the following section AFTER the recently added sections:
[Send job via e-mail]
Trigger_Binary=1
Enable_eMail=ON
eMailAdress=#AD_MAIL#
PDF_Mode=1
eMailSubject=your print job as PDF
eMailLog=ON
eMailBodyFile=#ELP_FORMS_PATH#EMAIL.txt
Important: The three sections need to be exactly in that order:
- Call the script
- Read the variable from the file.
- Use the variable from the file.
Variant 2: Use a user name from the PJL header of the print job and the Windows PowerShell to retrieve the print job owner´s e-mail address from the Global Catalog.
[get username from spool file]
Search_Binary=@PJL SET USERNAME="
StoreNextWordToVariable=#MYUSERNAME#
Search_Only_Once=ON
[trim the trailing doublequotes from MYUSERNAME]
Trigger_Binary=1
Variable=#MYUSERNAME#:STRREP(#MYUSERNAME#,",,1)
[Call the PowerShell script in to get the e-mail address from the Global Catalog]
Trigger_Binary=1
CallNow=cmd /c powershell -command import-module ActiveDirectory | powershell Set-ExecutionPolicy Unrestricted | powershell -command ".\getmail.ps1 #MYUSERNAME# .\tempmail.txt";OFF
[Read e-mail variable from file]
Trigger_Binary=1
Variable_File=#ELP_FORMS_PATH#tempmail.txt
[Send e-mail]
;=== like in the example before
Important: the order of the sections must be exactly like in the example.