 DE
DE  EN
EN The ELP Control Center offers a convenient way of adding all needed e-mail keys to any triggered section Rule assistant.
The job is usually converted to PDF or TIFF and sent as an attachment together with the body and the subject text. These two texts are usually in UTF8 plain text format and even ELP variables can be used to write for example the invoice number in the e-mail subject line.
For sending faxes and e-mails is the same process only the e-mail address for a fax is a fax number usually like 004911112222@fax.com.
In order to send e-mails, the in W-ELP´s Admin tab the e-mail must be configured!
There are multiple methods for collecting the e-mail address, they are all described below:
-
Read from the ELP database
-
Use one or more static addresses
-
Get it from of the Active Directory
-
Use variables to set the address, e.g. in the section for a User based rule.
-
Read from the data stream using StoreNextWordToVariable
-
Find automatically in the data stream if address fully ASCII coded and is surrounded by the ' character, example: 'support@stethos.com'
The editable fields are:
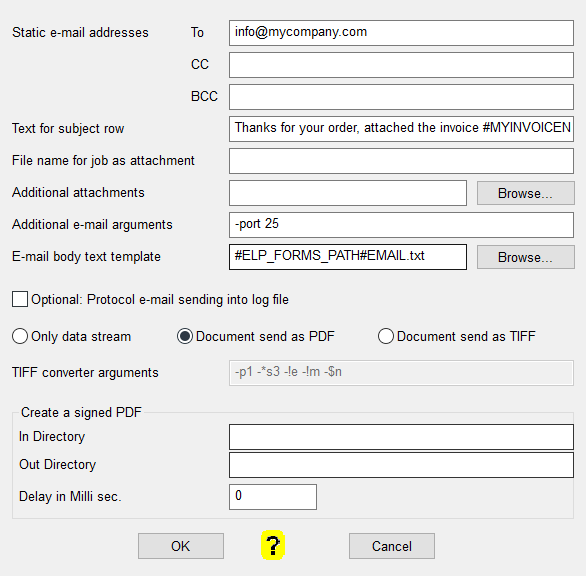
| Optional static e-mail address | In addition to e-mail address searched and found in the data stream, database, rules, additional static addresses separated by comma can be applied. |
| Text for subject row | Enter any text you like. Existing variables will be replaced with their values. |
| File name for job as attachment | The print job (or the generated PDF) will be named like this. |
| Additional attachments | Optional additional documents to send as attachments. |
| Additional e-mail arguments | Optional additional keys to used with the e-mail call. |
| E-mail body text template | The UTF8 encoded plain text file is searched in the ELP work path folder. Again - any available variable can be used in that file. |
| Optional protocol e-mail | Every sent e-mail/fax will be logged in the protocol file: c:\ProgramData\WELP\log_email.txt. It can be opened and viewed with the E-mail button in the Admin Register Tab. |
| Document send as PDF | The data stream will be sent as an attached PDF document, on request digitally signed. |
| Document send as Tiff | The data stream will be sent as an attached Tiff document. |
| TIFF converter arguments | Have a look in the W-ELP install subfolder pdfgen\Tiff\Documents\EPFaxCL for further information. |
Note: The default arguments for the PDF Converter can be modified in the file PDFConf.ini which resides in the Workpath folder. If one single default argument is not suitable for all conversion processes it's possible to use the key PDF_Arguments which allows workflow specific conversion processes.
A complete example: Self-training
More technical oriented information
As indicated above, ELP can send any output file as e-mail. That means that ELP needs to generate an output file! The command line parameter STDOUT is not allowed!
The usage of variables in any e-mail key is possible.
By default the e-mail functionality is turned off. The following table lists all additional ini file keys for proper e-mail support within ELP. They can be used in any activated rule.
Note: This key is only read in the first section where the key Enable_eMail is turned ON.
| Key | Default | Description |
| Enable_eMail | OFF*,ON | Activates the e-mail sending for this data stream. The keys are read from the section when the key is turned ON. |
| eMailFromAdress | If this key is used ELP will use this e-mail address to send e-mails. It will override the entry "EMailFromAdress" in MailConf.ini. Variables can be used. Applies only to e-mails sent when a print job / converted job is sent via e-mail. Admin and error e-mails are still sent via the address provided by MailConf.ini. | |
| EMailAdress | Any valid e-mail addresses, maximum length is 256 Bytes (!) The addresses need to be separated by comma. You may use also variable names, see example below. See below for other methods to get the addresses. |
|
| EMailCCAdress | Same as key EMailAdress, only addresses are used for the cc e-mail command. Note: You need to at least one address in the key EMailAdress, otherwise no e-mail will be sent |
|
| EMailBCCAdress | Same as key EMailAdress, only addresses are used for the bcc e-mail command. Note: You need to at least one address in the key eMailAdress, otherwise no e-mail will be sent |
|
| eMailSubject | Any title text for the subject, including variables if needed | |
| eMailBodyFile | Enter the full path and file name for the e-mail body text. You may use ELP variables in that file as well. There are various options possible. Even standard carriage return and line feed are working you can use also `r and `n in parallel. By default body files are sent as text in UTF8. If you like to change that to HTML you have to put hands on the MailConf.ini in the Workpath folder. | |
| eMailOnlyOneCopy | ON*,OFF | Turned ON ELP will just mail the first copy of the outgoing data stream (=Original). |
| eMailLog | OFF*,ON | Turn on if ELP generates a file log_email.txt in the Workpath folder (default: c:\ProgramData\WELP) and record all sent e-mails. |
| eMailArguments | Additional parameters for call of the e-mail sending tool. | |
| eMailAttachmentFileName | By default a random file name is used. However, you may define here any valid file name including ELP variables. If e-mails can be sent from several queues simultaneously, make sure, that the file names are unique! Do NOT set the .PDF extension, as ELP will add this automatically. If you define a file name suffix with max. 3 letters, e.g. .txt, ELP will trim this suffix automatically. |
|
| PDF_Mode | 0 : Do no conversion; 1 : Convert OutData to PDF and send via e-mail; 32 : Convert OutData to TIFF and send via e-mail; 32768: No OutData will be attached to the e-mail; If PDF_Mode is set before in an archive enabling section, the key PDF_Mode is not read anymore. Solution: Set in archiving also the PDF_mode for emailing, usually add 1. |
Setup ELP for sending automatic e-mails
-
Copy the file eMail.txt into any other file name and open the new file using an ASCII editor, like Notepad++. Write the standard e-mail text you want to send out with every printed data. It is possible to use ELP Variables within that text. Save the file.
-
Start the ELP Control Center, choose the Configuration Tab . Now think of how the e-mail support should be triggered, as you may want to send out several different e-mails, e.g. for delivery notes or invoices.
If always needed, insert the e-mail keys into one of the default activated sections/rules.
Triggered on data stream content, generate any Search/Trigger section, and add Search/Trigger command(s). This may have the benefit, that you can separate between languages.
Example: The section with the key Search_Text=Invoice will send an English body text and e-mail, subject, the section with the key Search_Text=Rechnung the German version. -
The ELP Control Center allows to add all needed e-mail keys to any triggered section: Click on Rule assistant, select in the settings group the used section and simply click on the Mail SET button. Using the menu above, the keys are now placed in the section and if need edit later one after the other.
- Send any print data stream and if the triggered rule becomes true, the data is sent in the defined format (Binary, PDF, TIFF or jpg) to the provided e-mail address(es).
How to get the e-mail addresses
-
Automatic search in the data stream
Once the e-mail system is enabled, the incoming data stream is parsed for e-mail addresses. The parsing is done after all potential search keys had been performed. The e-mail addresses need to be embedded into single quotes like this: 'first.lastname@Client.com'. You can define several addresses, by putting them all into separate quotes: text...'support@Client.com'...text....'info@Client.com'....text...
Or you may combine them: 'info@Client.com''Support@Client.com' (see the two single quotes in the middle of both addresses)
All addresses are collected up to a total length of 256 bytes.
Important for MS Windows users:
Like all other triggers in the data stream, the names must be findable. You may use the New rule/section function to find out, if the address including the single quotes can be found. -
Searched and loaded from the data stream
You may also use the Search_xxx keys in a different rule and store the next word into a specific ELP variable, which is finally added to the recipient addresses.[Global]
; default initialization
Variable=#MySearchedEMailAdressVariable#:info@stethos.com
; activate e-mail sending by default in rule global
Enable_Email=ON
eMail_Subject=Our Invoice #MyInvoiceNumber#
EmailBodyFile=#ELP_FORMS_PATH#MyBodyFile.txt; finally define an own variable to bring the addresses into the e-mail system
EmailAdress=#MySearchedEMailAdressVariable#
[Search for e-mail position]
; if nothing is found, the E-Mail is anyway send to the default address above
Search_Windows_New=your email address:
; if found, the default address is replaced
StoreNextWordToVariable=#MySearchedEMailAdressVariable#
You may also use in the initialization of the variable a dummy e-mail address and add to the
EMailAdress=#MySearchedEMailAdressVariable# key
the copy address as well
EMailAdress=info@stethos.com,#MySearchedEMailAdressVariable# key
or use the key EmailCCAdress -
Looked up in the database
This is probably one of the most convenient way to search for e-mail addresses or even to check if an e-mail needs to be sent. See database explanations. -
Looked up in the Active Directory
Open chapter Active Directory for getting an example.
Error handling when sending emails
By default, W-ELP will use the PowerShell features to send e-mails. If an error occurs when sending email via PowerShell, the PowerShell Script returns 1, otherwise 0. If the return value of the PowerShell Script is greater than zero, the variable #EMAILERRORCODE#, which is initialized with 0, is set to the error code 1 and the section [On_Error_Email] will be executed. To ensure that the section will be activated, add the key SetTrigger=1:ON to the GLOBAL section. As a predefined section, [On_Error_Email] is also evaluated at the beginning of each ELP processing of the data stream. In order to avoid that the section is activated at the beginning and to ensure that the section will only be activated on the event of an email sending error, the secondary trigger Trigger_Variable=#EMAILERRORCODE#:1 must be used in the section [On_Error_Email]
[On_Error_EMail]
; A primary trigger that will always be true
Trigger_Binary=1
; A secondary trigger to avoid the activation of this section at the beginning of the Processing
Trigger_Variable=#EMAILERRORCODE#:1
; Now insert any actions needed to be done on error
; e.g. write the error code to an external logfile
CallNow=cmd /c "echo On_Error_EMail #EMAILERRORCODE#! >> C:\tmp\Email_Error.txt"
Sending out fax to an e-mail or fax server
Is exactly like sending e-mails. The fax communication is also done using the SMTP protocol. The difference is, that instead of an e-mail address the usual used syntax is Fax-Number@fax.com.
So fax addresses are collected using the exact same ways as above.
If you want to be sure that no illegal signs are in the fax number, then use the key Check_TelNo as described here:
The e-mail address is then set together using the variable fax number in the EmailAdress key.
[Global]
; whatever is needed plus initialize the variable #MyFaxNumber#
Variable=#MyFaxNumber#:0000
SetTrigger=1:ON
[Need to send the document as a fax]
; if in the data stream the word Faxto: is found
Search_Binary=Faxto:
; then store the next 100 characters but maximal to CR-LF in the variable #MyFaxAdresse#
StoreNextWordToVariable=#MyFaxAdresse#;100
; and delete both, trigger and number
Erase_Binary=ON
[when during reading the stream in a fax number is found]
; Primary trigger is always true, as a 1 is always found
Trigger_Binary=1
; The rule becomes true if the content of the variable is not anymore the initialized value.
Trigger_Variable=#MyFaxNumber#!0000
; The first erase possible illegal characters from the number
Check_TelNo=#MyFaxAdresse#
; Turn e-mailing on
Enable_eMail=ON
; Select the attachment (data stream) to be sent in TIFF
PDF_Mode=32
; use these TIFF converter arguments
TIFF_Arguments=-p1 -*s3-!e
; setup the correct "e-mail" address
EmailAdress=#MyFaxNumber#@Myfax.de
eMailSubject=Fax form xxxxxxxx
eMailLog=ON
eMailBodyFile=#ELP_FORMS_PATH#EMAIL.txt
Notes for sending attachements by e-mail / fax
Use in any section of the ini file the key PDF_MODE with the following integer values:
| Value | Description |
| 0 | PDF_Mode is turned off |
| 1 | Only valid if ELP is configured to send the output data stream to an e-mail address. If this is the case the value it will convert the PCL data stream to PDF and then send the PDF file instead of the PCL file. The PDF file is then erased. |
| 2 | When the key OutArchiveDir is used to store the outgoing data stream into an archive directory, ELP generates in the archive directory also a PDF file of that stream |
| 4 | When the key InArchiveDir is used to store the incoming data stream into an archive directory, ELP generates in the archive directory also a PDF file of that stream. |
| 32 | Instead of PDF, TIFF is stored or sent via e-mail |
| +16 | Add 16 to the values above if only the PDF should be stored. In order to generate the PDF file, the data stream is temporarily stored, but after the conversion erased. |
| 32768 | Only the file specified in EMailAddAttachment is sent via e-mail |
Beside the value 0 and 32768, all values can be combined or summed up using different settings of the key in different sections! If the print data should be sent as e-mail and at the same time archived, both as PDF files, then set the PDF_MODE key to 3 (=1+2).
The recommended PDF converter is able to create searchable PDF files! This means that you are able to use simply Windows File Explorer search methods to find information not only in the stored PCL data stream, but even in the PDF file itself.
If the text is not directly searchable, maybe because a Windows driver puts between every character a positioning statement, then ELP offers a couple of ways to make it searchable.
-
Store the print file including the PDF into a directory and use the ELP Control Center Archive search function.
-
Generate an index file, where all searched words are located, see here.
-
Send the data stream again to a second queue, and create as an output only ASCII data, using command key PRINTONLYASCII
The PDF converter provides additional command line keys. These keys can be set in the file PDFConf.ini in the Workpath (e.g. C:\Program\Data\Welp). If the text in a form is gray instead of black, then add to this command the argument "-n:1".
Related downloads: blat legacy package
Related articles: Archiving