 DE
DE  EN
EN ELP is a kind of a tool box. It provides a lot of functions, and only the barcode (industry standard method) and the ELP_Command search in the print file itself are turned on by default. All the other functions need to be activated.
The goal of setting up rules is to apply any functionality ELP offers, without even the need to change the data stream.
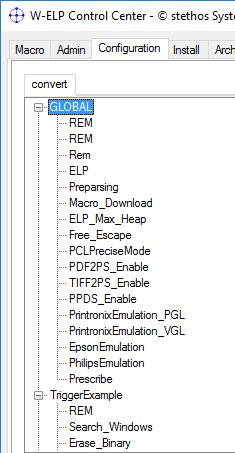
Every task/rule has to be located in a section. The section names can be freely defined up to 512 characters. You can write as many explanations in the section name as possible. Be aware that there are some predefined section names!
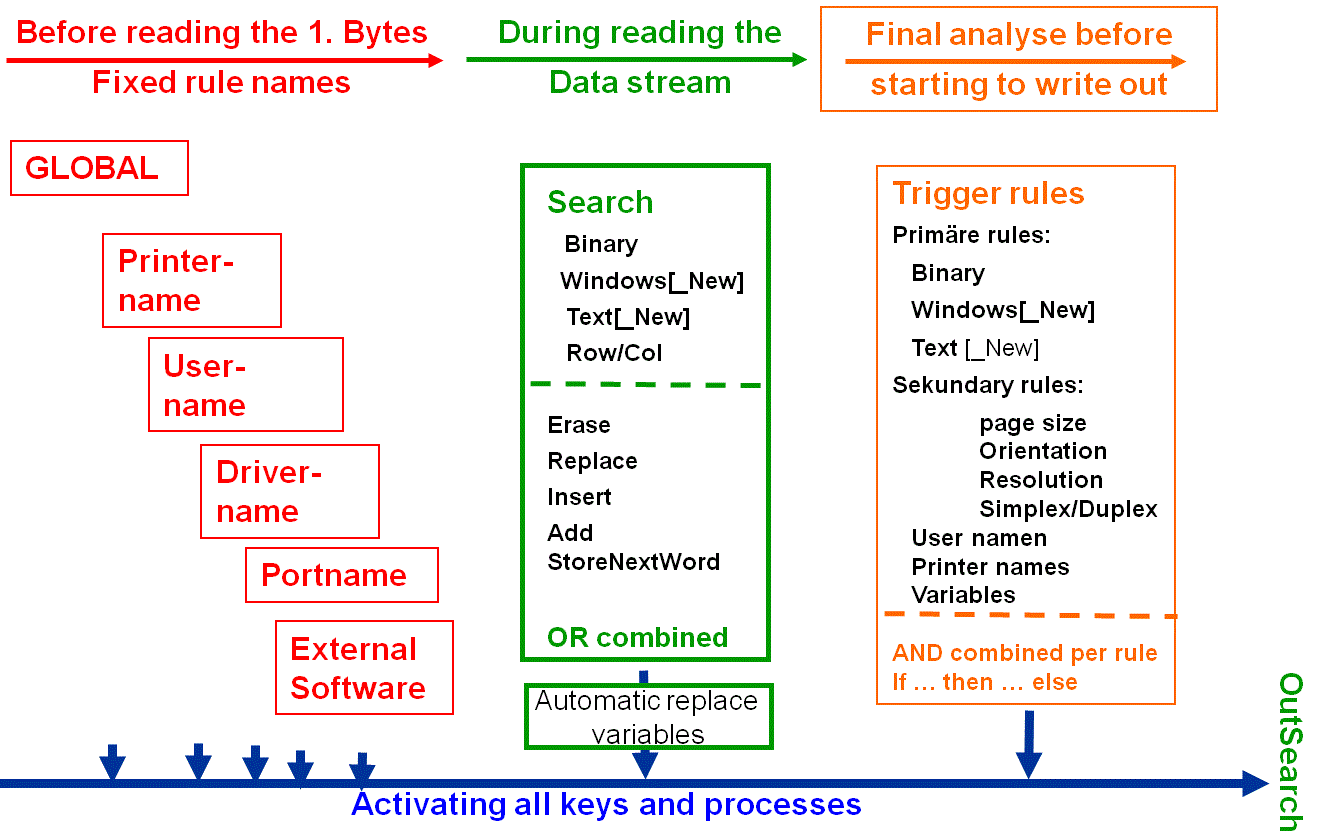
ELP offers these options to perform any rules, listed in the appearance flow through the ELP process:
Note: Some of the functions are limited to the Windows environment. Please see below
Direct after the start of the ELP Software (Windows: Automatically from the job arriving in the print queue , Other by Command Line call ), the software tries to read the content of the provided IniFile, which is supposed to hold all instruction on what to do. Starting with version 7 the file can also be part of the data stream, but this possibility is more for programmers, see further below chapter 3.
1. Right at the beginning of the process, before even the first byte of the data stream is read
Depending upon the platform ELP does automatically check for specific rule names in the ini file and if found, apply the keys listed in the section.
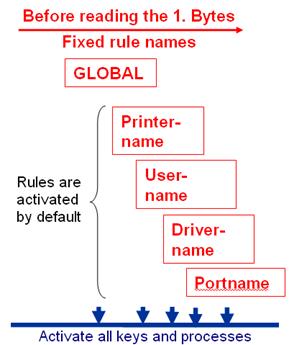
| Global | Every command key in this section is activated right at the beginning. You can place all functions in here, which are always performed. Like for example Debugging the process if you need external help from our support team |
| PrinterName | Every command in this section is activated for every print job which reaches ELP through this queue. This option is for Unix based system only available if the -P1 option is supplied in the command line. It's not available in AP-ELP boxes or printer firmware based versions. A printer name based rule can be easily setup using the top left window of the Add Rule/Section function. The Printer Name rule is normally used if a queue performs a special function, like invoice or delivery note printing. under MS Windows the PrinterName is the name of the Queue. Example (where the keys in rule Global of convert.ini are as well executed, but then next:): [Delivery note] ; When a job comes through this queue/printer, then take another config file from the c:\ProgramData\WELP folder IniFile=#ELP_FORMS_PATH#Delivery.ini |
| UserName | Pretty much the same as the section PrinterName, executed if the job owner name matches. For Unix the name must be passed in using the -P3 command line option. It's not available in AP-ELP boxes or Ricoh device based versions. Often, especially for HP Windows driver based data streams, the user name is also listed in the data stream itself. In that case, ELP will use this name! The User Name rule can be used for example to add special pictures or watermarks or to restrict color printing etc. |
| DriverName | Same functionality as Printer- and UserName, but related to a special used Windows driver like "HP LaserJet 4000PCL 5e". The available driver names are listed in the printer configuration -> enhanced tab. For Unix the name is passed in using the -Q1 command line parameter. It's not available in AP-ELP boxes or Ricoh device based versions. A driver name-based rule can be easily setup using the top right window of the Add Rule/Section function and can be used for example for driver specific tray settings or data stream manipulations.
[Lexmark Optra T420] ; When a job comes driver TrayMap=Lexmark conversion [Lexmark conversion] Tray1=4 Tray4=5 |
| PortName | Same functionality as Printer- and UserName, but related to the defined port name. like lpt1 or an IP Address. This option is mainly used for the big AP-ELP box similar to the PrinterName functionality. A port name based rule can be easily setup using the lower left window of the Add Rule/Section function. |
Hint: With the key TriggerSection could you analyze already variables, which had been set even before the first byte was read.
[Global]
; Tell windows that the trigger isFound is already found
SetTrigger=isFound:ON
; Evaluate the variable #PRINTDOCNAME# before one byte was read
TriggerSection=Check if Job comes from MSWORD
[Check if Job comes from MSWORD]
; Primary trigger always true
Trigger_Binary=1
; Is the job coming from MS word
Trigger_Variable=LEFT(#PRINTDOCNAME#,16):Microsoft Word -
; Then do nothing
PassThrough=ON
Exit=ON
You may use in any automatic processed as well as in any other activated section the ELP key IniFile. This function does stop analyzing of the actual loaded convert.ini and loads the new named one. The following effects then apply:
-
All Trigger_ and Search_ rules of the new loaded ini file apply
-
The Trigger_ and Search_ keys of the calling command file are erased, but already processed rules still apply!
-
The described above startup process is also applied to the new ini file.
-
If a Search_ rule does load the new ini file and you want to perform also Erase_, Add_, Insert_ or Replace_ functions, then those keys need to be defined in the new ini file but with the same rule name!
The keys iniFile, Search_ and Trigger_ do not really make sense in the rule GLOBAL.
2. Then any external software can be called and return any rule / variable for further rule evaluation
If the key CallAtStartup is defined in any default startup rule, the external software named in that key is now processed.
Here the ELP example for JobTicketing, which can be activated in Rule assistant and performs up to 8 user definable ELP rule settings.
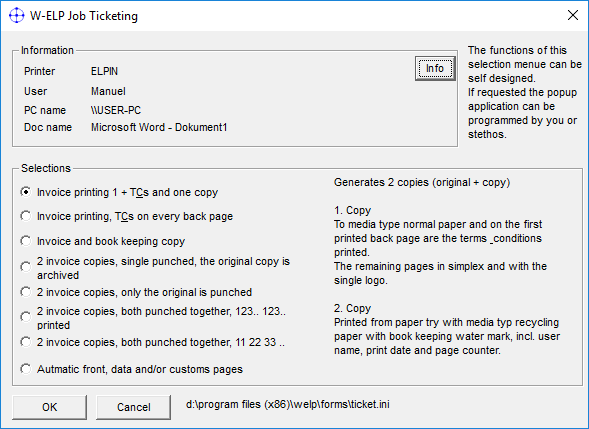
ELP is shipped with a Job Ticketing and with an Accounting example. The picture above displays the Ticketing solution. The up to 8 selectable tickets can be defined in an external ini file, using standard rule keys.
The selected information is returned as described in the next described process step.
Note: If a user needs to make an interaction, ELP must be installed on the user PC, or he must have access rights to the server console.
3. A rule set (ini file) can also be set in front of the print job.
Starting with Version 7 (not in I-ELP), the ini-file can also be part of the data stream itself and must be located at the beginning. The definition starts with the ini-file and ends with an UEL in a new line, usually followed by @PJL ENTER LANGUAGE=PCL.
This method is used mainly in conjunction with the CallAtStartUp key. But any other command set or variables and can be processes back or simply defined.
\x1B%-12345X @PJL ENTER LANGUAGE=ELP
[Global]
ELP_Command=K2;
\x1B%-12345X
where \x1B stands for ASCII 27 / Hex1B.
It is read from and erased in the data stream and finally used by ELP. As it is erased, this command can be right in the middle of the data stream, and ELP will process it, just as this ini-file part would never be there. It can be used, for example, as a new directive. However, it is recommended to use that directive just right in front of the real data stream and NOT in the middle.
The maximum length of the total ELP ini file in a data stream is 64K Bytes!
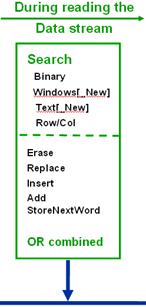
4. Searching in the incoming data stream for information and change or apply rules on them
ELP provides 5 different methods to find data / text information in data streams. Search_Binary, Search_Windows. Search_Text, Search_Windows_New. Search_Text_New, This is needed, as it can be quite complex to find such information especially in Windows driver based data streams.
In addition for ASCII or close to Ascii data streams, Search_RowNo is able to read information form a specific page, row and column position and with a certain maximum length.
The differences among Search_Binary, Search_Windows. Search_Text, Search_Windows_New. Search_Text_New are explained in the Admin manual or briefly here. But the differences are not really needed to be known, as the ELP Control Center offers during the rule definition the possibility to run the searched information against the previously captured data stream. Then the best method is used.
The Search methods: Binary, Windows and Text (not NEW!) can in addition modify the search stuff, or insert/add something or erase it as well.
All methods can read back information from the stream, which are located behind the searched text. If you have this in your data stream. Invoice Number:4711, then you can read the number into an ELP variable when you search for: Invoice Number:
It is not relevant; where the searched rule/section is located in the ini file. When the text or data is found while reading the data stream byte by byte, the section is activated. You may even have several search statements in one rule. Anyone found will trigger the rule.
There are special keys available that an item is only searched one, or that all search statements are for the rest of the stream ignored.
If.. then ... else constructions can be applied as well.
5. After the stream is passed into ELP, the so-called trigger rules are analyzed
The second last possibility to apply rules to the ELP printing system, is using the Trigger methods. In order to use that method the ELP=ON key must be present. The difference to search is, that all rules/sections with Trigger_ evaluation keys are examined after the complete data stream was read. There for the Erase, Add etc. commands can't be used.
Due to memory restrictions, for HP /Ricoh firmware this evaluation starts for the internal version after about 1.5 Megabyte reading and using the AP-ELP box versions, maximum at 50 MByte.

Comparing to the search method, for Trigger rules it matters, if they are at the beginning or end of the ini file. The ELP process does analyze them from top to end.
Several Trigger_.. keys in one section are combined by an AND operation. So all triggers in a section need to be evaluated as TRUE, then the section is executed. In order to verify the so-called secondary triggers, all provided primary triggers need to be fully filled (TRUE)
ELP Control Center offers during the rules definition the possibility to run the triggered information against the previously captured data stream. Then the best method is used.
6. The data stream is searched for valid ELP_Commands
This is a quite historic function in ELP, developed even before the age of ini files. Any ELP_Command can be defined direct in the data stream, surrounded by default with the << and >> characters. For Example: <<F1000;>> in the data stream will [re]define dynamically the first print page as form 1000.mac.
7. Finally while writing the processed data stream out, additional searches on the stream can be performed with limited actions.
Ini file keys: OutSearch_Binary, OutSearch_Windows, OutSearch_Text perform exact the same like the SEARCH keys, but
-
the search is based on the outgoing data.
-
the only executed action keys are: - StoreNextWordToVariable - StoreNextWordToIntVariable - RememberFilePos & OverWriteInOutFile - Add_Binary - ELP_Command - Counter - all Call keys - Read all keys Variable= name:Value- ini file (Add_Binary then needs to be used in the same rule name but in the loaded ini file)
Those keys can for example be used in conjunction with splitting the data stream into X archived print files, using an archive file name based upon a value found in the data stream, like an invoice number.
If.. then ... else constructions can be applied as well.
8. At every FormFeed and at the end of the job process any external software can be called
Special Call keys can be used to call any external software and if needed, read back and insert additional data streams.
Example: If on the front page of a document an special machine is offered, ELP can automatically insert on the back its specification data sheet. Or special customs information collected and inserted right after the last page of the invoice.
9. Special Add-ons:
In all activated sections special keys can be used to gather additional information / variables from:
-
ELP provided database engine,
-
ActiveDirectory: (For windows only!)
-
Read (Write) variables out of special variable files
| Global | Those keys are always executed for each job |
| PrinterName | Those keys are only for jobs coming from that queue executed (Unix: -p1 command line option) |
| UserName | Those keys are only executed for jobs coming from that user(Unix: -p3 command line option) |
| DriverName | Those keys are only executed for jobs coming from that driver. Note sometimes printer and driver name are identical, try to avoid that. (Unix: -q1 command line option) |
| PortName Boxes | Those keys are only executed for jobs coming from that port. Windows, Unix: Only for jobs being send to that port. (Unix: -p9 command line option) |
| Epson | Parameter definition for Epson emulation |
| PPDS | Parameter definition for Proprinter emulation |
| Prescribe | Parameter definition for Kyocera Prescribe emulation |
| Printronix | Parameter definition for PGL and VGL emulation |
| Passthrough | Executed when the key passthrough=ON is activated or the ELP process falls into PassThrough mode, due to certain data stream formats. |
| CallNow | Reads all counter and variable keys at the time the rule is activated, when the same named command key is used |
| CallAtFormFeed | Reads all counter and variable keys at next Form Feed, when the same named command key is used |
| callatstartup | Reads all counter and variable keys at Start up, when the same named command key is used. But after reading the top 5 rules/sections. |
| CallAtEnd | Reads all counter and variable keys at the execution end, when the same named command key is used |
| CobraBox | Parameter definition for Cobra Box barcode emulation |
| PrinterSettings | If one or even more of those triggers are used in the ini file (Orientation, Page_Size, PaperTray, Printer_Names, Resolution, Simplex_Duplex) in order to trigger upon certain print job settings, but the proper information is missing in the data stream, ELP reads the default "printer" setting out of the section "Printer Settings" of the actual ini file. |
| ELP activated printers | All names of any activated queue are saved here as well, as especially some HP LaserJet drivers have the bad habit to replace the print processor in all queues one a new queue is installed. In other words - the installation process of the new queue will deactivate all other ELP queues based upon the driver (mostly seen with original HP LaserJet drivers). On order to overcome this issue we recommend to use the ELP Port Monitor instead of the ELP print processor. This feature is present since W-ELP Version 19.xx.xx. However, once the ELP Control Center is started, it asks to reactivate the previous W-ELP enabled queues. |
| PRINTERLANGUAGE PDF PRINTERLANGUAGE TIFF PRINTERLANGUAGE CALS PRINTERLANGUAGE NOT FOUND PRINTERLANGUAGE PCL PRINTERLANGUAGE PCL3GUI PRINTERLANGUAGE POSTSCRIPT (RPS) (KPDL) PRINTERLANGUAGE PCLXL PRINTERLANGUAGE RPCS (RCS) |
At the beginning of each ELP processing of the data stream, the ELP software voter does check the print file for a known printer language. PCL5 based data streams are fully processed by ELP, others like Postscript or PCL6 (PCL-XL) can partly be processed. Once ELP did detect one of the known and left hand named print data stream languages, the configuration file, most likely the convert.ini, will be checked for the corresponding section name. Once the section exists, the keys inside are evaluated. So for example it is possible to store such streams at special locations, or to CallNow a special external command set. |
| PRINTERLANGUAGE UNKNOWN | At the beginning of each ELP processing of the data stream, the ELP software voter does check the print file for its personality, like PCL, PostScript etc. In the case that the personality can’t be determined the internal type UNKNOWN is set. Please note that without any configuration (ini-File) the data stream is NOT allowed to be larger then 1.37 Mbytes. Any longer data stream will be truncated to this size. The data stream is by default parsed through the PCL converter. As above, unloved changes could apply. If you wish to pass any UNKNOWN streams directly 1:1 to the device, you need to have a convert.ini. If this configuration file has no rule "PRINTERLANGUAGE UNKNOWN" with minimum one defined key, ELP/IBS does passthrough the complete job. The truncation border does NOT apply. If PassThrough was turned on in rule Global or in any other by default activated rules like user name or printer name, the personality rule "PRINTERLANGUAGE UNKNOWN" is not executed. |
| PRINTERLANGUAGE AirPrint PRINTERLANGUAGE BMP PRINTERLANGUAGE PWGRASTER PRINTERLANGUAGE RPDL (R00) PRINTERLANGUAGE ESCP (R16) PRINTERLANGUAGE R55 PRINTERLANGUAGE 98 PRINTERLANGUAGE HPGL (GL2) PRINTERLANGUAGE RGL PRINTERLANGUAGE RTIFF (RTF) PRINTERLANGUAGE BMLINKS PRINTERLANGUAGE PDF PRINTERLANGUAGE PICTBRIDGE PRINTERLANGUAGE XPS |
At the beginning of each ELP processing of the data stream, the ELP software voter does check the print file for those unimplemented printer languages using the PJL command @PJL ENTER LANGUAGE = Personality. If in the actual processed ini-file (usual convert.ini) such a rule name exists AND does have minimum one defined key in, the data stream is processed through ELP`s main PCL parser, including processing all searches, triggers and the keys found in that personality rule. Note: Check that the PCL Parser does not do any changes to the data stream!!! If the ini-file is missing, it is usually in IBS, or in the provided ini-file the Personality rule "PRINTERLANGUAGE yyyy" is missing, the data stream is 1:1 passed through. ELP/IBS does not do any changes. If PassThrough was turned on in rule Global or in any other by default activated rules like user name or printer name, the personality rule "PRINTERLANGUAGE yyyy" is not executed. |
| END OF CONVERT | Right before the end of the ELP process this rule section is searched in the actual processed ini-file and, if found, it's content is processed. |
| On_Error_Email | Executed when the value of the variable #EMAILERRORCODE# is greater than zero due to an error while sending email via PowerShell. This section can be used to perform certain actions in the event of an email sending error. For further information please refer to error handling when sending emails. |
General structure, location and syntax of ini file.
The ELP ini file is build upon the same syntax as any windows ini file. The different components are:
| [section] [rule] |
Every project is coded as a section, wrapped in [ and ]. Every Inifile should at least define the [GLOBAL] section. This section is performed right at the beginning of the ELP process. Here you can define all common actions. Blanks at the beginning of the section name are NOT allowed. You can define as many rules/sections as needed. A section can be seen as a unique action. The section starts with [ and ends with ]. There are no additional characters allowed to the left or right. The first character must be a [, the last in line a ]. Example: [ThisIsASectionDemo] or [This Is A Section Demo]. Wrong is a leading blank: [ This is..... |
| ; Any text | If a command line starts with a semicolon, the line is ignored. This statement can be used for documentation |
| Key=Argument |
Any ELP Command key starts with the key name followed by an Equal sign and the keys argument. For this argument, the following rules apply:
|
[This is a rule]
; This is for documentation
SEARCH_BINARY=SearchData
; With additional blanks
TRIGGER_BINARY=" SearchData"
; With hex characters, which will be converted to the single sign
ADD_BINARY=EndOfFile\0x0C
ADD_BINARY="EndOfFile\0x0C"
For Windows systems, the startup convert.ini is set in the expert mode of the Admin Tab. Usually the file is located at c:\ProgramData\WELP\convert.ini. In the same directory you find a file convert.ori, which is a copy of the original installed file.
For all the other software installations the file needs to be passed in using the ELP Command Line Arguments, See here: X-ELP and Linux / Unix / AIX / Solaris etc.
Related articles: Installation and configuration of ELP for Ricoh devices, New rule/section, ELP key evaluation order in the config file