 DE
DE  EN
EN A new rule can be inserted from the Configuration Tab and the Rule assistant window.
As explained in the theory of ELP rules activation, ELP does evaluate during print job processing the main rules in this order:
1. The rule GLOBAL
This rule cannot be defined here, as it is a default rule, which is usually always available
2. Those following 4 rules are evaluated during the process start-up
ELP checks if its configuration file (convert.ini) contains a rule named like a the user, like a printer queue, like a printer driver or like a printer port. This happens even before the first byte of the data stream is read.
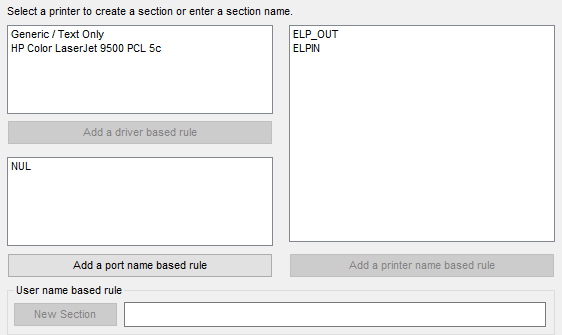
| Queue/Printer Name | If a rule has to be based upon a queue name, double-click on the appropriate name in the top right window. If your activated queue is not listed there, then there is already a rule for that queue name defined. |
| Driver name | If a rule has to be based upon a used Windows driver name, double-click on the appropriate name in the top left window. Note: You may to see in the right-hand Window much more queues listed than drivers. Double-click on the appropriate name and move on to the next step to add functionality to the new rule. A driver rule can for example be used to apply a special paper tray handling for that unique Windows driver. |
| Port name | A special functionality can be applied for a specific port receiving the data stream. The usage is pretty much the same as the printer name above which is not available for ELP in the print server implementation. Double-click on the appropriate name and move on to the next step to add functionality to the new rule. |
| User name based rule | Enter the Windows/Unix Logon Name of the user, for whom a specific rule is needed. ELP searches cases in-sensitive, so don't worry about upper and lower case typing. Click on the button "New section" and move on to the next step to add functionality to the new rule. |
In some cases just a new rule name is needed. The rule might be automatically executed within an "if .. then .. ELSE rule_name" process, using an ActivateSection or one of the similar keys.

Simply add the new rule name using the user name field and click after done on the "New Section" button.
The most common method for setting up the rules is to search the data stream for certain information and if found apply rules to it.
As explained in the Theory of ELP rules activation it can be quite tricky finding text in data streams generated out of Microsoft Windows applications.
It is highly recommended to first capture the data stream before starting setting up the rule.
On a Windows based implementation, this can be achieved by setting ELP to the debug mode (Rule assistant - Debug ). Or even maybe more convenient open the printer driver properties, then open the enhanced register tab and enable the checkbox don't delete print job after printing. In this case every print job will remain in the queue and can be reprinted with a right-click. The spool file can usually be found in the c:\Windows\system32\spool\printers directory, named with the file ending .SPL.
3. The steps for setting up any data stream content based rules are:
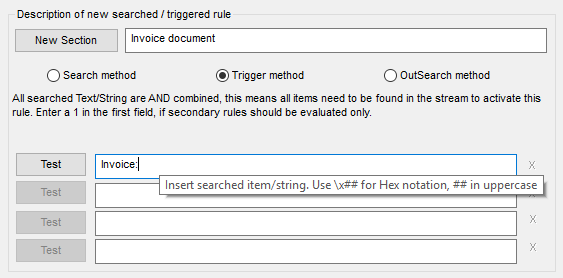
1. Define a self-explaining rule name, remember you have up to 512 bytes per line (Invoice document)
2. Define the method when the rule should be examined. The full documentation is here: Theory of ELP rules activation.
- Search method: While reading the stream into ELP byte by byte. Benefit: Early finding, possibility for data stream manipulation and reading content into variables. Several Search Arguments in one rule are OR combined!
- Trigger method: Rules can be prioritized and the rule activation can be linked to several events becoming all true or not. Several arguments below are AND combined.
- OutSearch method: See Theory of ELP rules activation.
3. Type in up to 4 searched terms (Search and OutSearch mode are OR combined, the Trigger modes are AND combined) and if you captured a data stream "TEST" each item if ELP can find it.
Notes:
-
You can add later more searched or triggered terms, using the "Add key" button
-
If you have no test stream, then you will be asked later which search methods should be used. But it is recommended to always run the rule against a data stream: How to capture data streams.
-
An X after the search term indicates that you did not yet test if the term can be found in the data stream.
-
The # sign after it the search term indicates that it was searched for the term, but could not be found. In that case the first choice is to use a different driver for printing and test again
-
A number after the search field indicates the search method which was used to find the term1: Binary,
2: Windows,
3: Text,
4: Windows_New,
5: Text_New, -
For triggered rules: If only a secondary trigger function has to be evaluated, then simply search for the character 1, which can be found in nearly every data stream, if not then set in the rule GLOBAL the key SetTrigger=1:ON
- Set the searched argument within " argument " if it starts or ends with blanks
- You can use the hex notation \x## to use non-printable characters (like form feed: \x0C) as search terms (## need to be upper case).
- If after that rule is examined and became true, and this is the last one you needed to examine, then add the key Exit=ON to the rule
4. Generate the rule by clicking on the "New Section" button.
5. Just in case you haven't tested the terms against a data stream, a window pops up and you are asked for the proper search method. if you are not sure which oen is needed, use the Search_Windows_New method and make sure the key PreParsing=ON in the rule GLOBAL.
6. The Control Center software opens now a search/trigger method related window, which gives access to the most common used function keys, search method related. If nothing is needed just click on cancel and select the proper needed function out of the Rule assistant.
- Search method related keys
- Trigger method related keys
- OutSearch method related keys
7. Now you are done with setting up the rule, if still needed, apply any function from the Rule assistant or open direct the complete list of available keys and add the requested ones.
Related articles: Theory of ELP rules activation, Rule assistant