 DE
DE  EN
EN The main function of this tab is to generate ELP usable forms. A form can be a signature which can be freely positioned, a watermark or a fully real form. It can be black and white, as well as in colour and ELP offers possibilities to address every single page of every single copy and add there different forms, like for example advertisements.
Click here if you need to know how to generate forms from scratch: Generate an ELP usable form
For UNIX, Linux, AIX, Solaris etc. Please install the W-ELP (Windows based) demo version and then upload the final forms to your system.
This register offers 3 functions and is usually used to generate so called printer macros.
1. Adding forms, logos, signatures etc. to the ELP printing system.
The certainly most used ELP function is to insert logos, forms, additional pages or signatures into the data stream. Each form usually over laid on the print data using the so called ELP_Command key.
The ELP system offers several ways to add such files (listed by priority):
- Using the Control Center Macro Tab. See generate an ELP usable form for detailed explanation how to generate forms, or have a look into the Self training.
- Adding in the data stream an ELP Command directly: <<F####;>>. Forms management and printer handling (ELP_Command)
- Using the Control Center with special PPAdmin.exe command line arguments
The first method can be used for the printer firmware version of ELP for Ricoh and HP and generates the macro files on the fly on the printers mass storage device.
Both, the first and second option can be used for generating dynamic forms, which might be inserted into an incoming job as a customised data sheet. They don't need User or Admin interaction.
However, most forms are static and are generated only once and are kept for a long time. Therefore the Control Center Macro Register Tab is used to convert a printed form into an ELP macro.
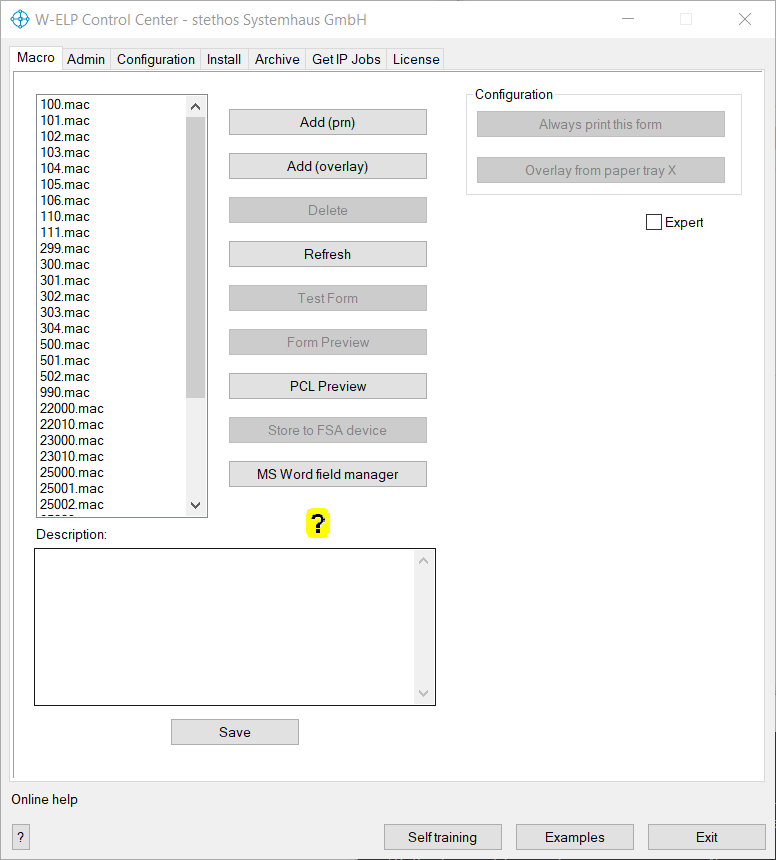
| Add (prn) | How to generate a form and adding it to the ELP system is described in this document: Generate an ELP usable form. For non Windows based installations, you may then upload the ####.mac file binary to your workstation, into the path, defined in the /d command line option of ELP main process. You may also use the ELP_Command parameter F described here |
| Add (overlay) | If you already have existing PCL5 downloadable macro files beginning with <Esc>&f<MacroID>Y<Esc>&f0X and ending with <Esc>&f1X or <Esc>&f1X<CR> you can batch imports those into the forms repository here. Existing forms will be renamed by adding a Date-/Timestamp before the .mac extension in order to preserve the original form. Such renamed forms cannot be used because a valid PCL form must have the format ####.mac (numbers only) and must be renamed manually to a valid number before they can be used again. |
| Delete | Deletes the marked form. It is recommended to copy it first into a backup folder, you may need the form for future purposes. As your local law may require to be able to reprint documents as they had been in the past, it is maybe a good idea to generate always new forms and change the applied rules. |
| Refresh | Use this once you manually changed any form file in the WorkPath folder using e.g. the Windows file explorer. |
| Test Form | Will print the marked form called within a simple text line on any ELP enabled queue. As there are usually no reset or page size definitions in the form, you need to select the proper sizes. Note: The test page will run through the standard ELP system. If you have already defined some rules in the configuration file, they can be applied as well. |
| Form Preview | Creates a PDF preview file of the selected macro for rapid checking of the result. W-ELP is using the bundled XpdfReader for that purpose. If you want to use the OS defined PDF viewer (if present) feel free to rename or delete the file .\xpdf-viewer\xpdf.exe in the W-ELP install folder. Every PDF preview will be created with these PDF converter arguments specified in the Workpath (e.g. c:\ProgramData\WELP) PDFConf.ini in the section [PPAdmin]. |
| PCL Preview | Creates a PDF preview file of a printable PCL file for rapid checking of the result. W-ELP is using the bundled XpdfReader for that purpose. If you want to use the OS defined PDF viewer (if present) feel free to rename or delete the file .\xpdf-viewer\xpdf.exe in the W-ELP install folder. Every PDF preview will be created with these PDF converter arguments specified in the Workpath (e.g. c:\ProgramData\WELP) PDFConf.ini in the section [PPAdmin]. |
| Store to FSA device | ELP Control Center needs to be in DIMM mode. |
| MS Word field manager | A MS Word macro which helps to create PCL5 macros including variable data. [Read more...] |
Notes about forms generation
-
The macros / forms will NOT be loaded if the key Macro_Download is turned off. By default it is ON.
-
Also by default, ELP will parse any loaded macro and run it against all search rules (Not Trigger). So example macros can contain variables, and those will be overwritten by the real content of the variable. If no such things are needed, you may speed up the process, by using this key: FastMacroLoading=ON which then will take the form and send it unchanged to the printer.
-
If the form is not correct printed, then generate it again, but set the driver to print all in graphic mode. If the result is still not ok, try another driver.
-
A very easy way to setup dynamic macros is the MS Word Forms & Field Installer.
- Do not generate the prn file, using an ELP activated queue! You might include the demo watermark into the form.
- If you have Kyocera printers / MFPs then it is recommended to use the Kyocera Universal Classic PCL5 driver.
There are quite a lot of ways to address a form. Here is a short summary of the possibilities:
-
Using PCL Escape Sequence, a method for programmers, see watermarks
-
Search for any data stream information or printing strings and add forms, page 92.
-
Trigger for the same items and use ELP commands to define a total output sequence, even if it is only one form. Just have a look into the self training!
-
Link the job to a queue/printer or user or simply do it always, see new rule/section
-
Link the form to a special windows driver see new rule/section
-
Define the functionality on a triggered database, see Using the ELP build-in database
2. Quick rule set for forms usage
The macro page does also provide two quick ELP applications:
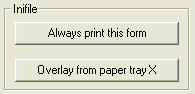
| Always print this form: | Adds to the rule GLOBAL in the active startup ini-File (convert.ini) an ELP_Command: C1F####; This command will print the selected form on every page which ends with a form feed. In order to delete the command, open the ini file (configuration tab) and erase the ELP_Command in the section GLOBAL. |
| Overlay from paper tray X: | Same function as described above, only in addition linked to a specific paper tray. The following rule is added to the startup inifile (convert.ini)
[Overlay Form printing from paper tray X] TRIGGER_BINARY=1 PAPERTRAY=4 ELP_COMMAND=C1F100; The command key PAPERTRAY=4 defines that the form is overlaid, when the job is printed form the selected tray with PCL number The number 4 is for most printer manufacturer the default paper tray. You may need to change the number, if any other tray has to be used. The PCL paper tray number is not the same as the trays are numbered. The correct number can either be found in the printer manufacturer PCL technical reference manual or when you double click on the ELP_Command, The opening ELP Command Generator has a paper tray drop down list, which names quite a lot paper trays and their PCL number in (#). |
3. Expert, reads back or writes files to/from printer hard disks or other permanent flash media.
This part of the W-ELP software is freeware provided "as-is" with limited support. It is tested on lots of professional HP and Ricoh printers.
The Expert mode will try to read or write files from any FSA (File system Architecture) device. It can be used for file operations like upload, download, delete of also creating and deleting folders.
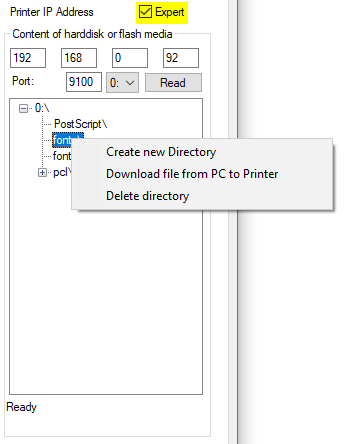
After having entered a valid printer IP Address and a read port, you may click on the read button and try to READ back the directory and file structure. Usually at the bottom of the frame you see the actual analyzed sub directory. However, note this message may sometimes freeze, but the reading continues. You can't abort the reading. You either need to wait until all is read, or if needed, shut down the software via the Task-manager.
After the structure is displayed, you may mark an item with the right mouse click and check for the actual possibilities W-ELP provides.
An interesting example about adding watermarks, user names and other variables as macro can be found here.
More basic examples her: Print on the first page a full letter head and only the logo on the following pages. Adding form feeds and insert pages. and in the self training.