 DE
DE  EN
EN This tab provides the following functions:
Important: Any changes need to be saved by pressing the "Apply button". The "View" settings need additionally a restart of the Control Center Software to take effect.
Most options will be only visible after enabling the expert checkbox:

1. General start-up settings for the Windows ELP process
Unless you develop rules for the Ricoh printer internal platform, there are usually no additional settings in this section.
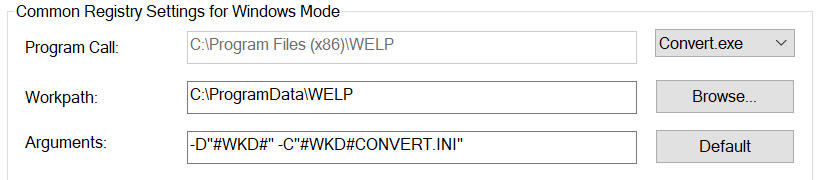
| Program Call | The field contains the path to the main W-ELP process, a stand alone command line program named convert.exe. |
| Workpath | The Workpath should point to a folder where the OS spooler and the user have full write and read permission. If the folder needs to be relocated just copy the full content to the destination folder and also set the required permissions. The out and trg communication files to the W-ELP software are stored there. You must not add a \ at the end. In any case the Workpath can dynamically be changed using the key WKDIR. |
| Arguments | The Arguments field may contain any additional command, but read the ELP Install Manual very carefully before changing the defaults, or adding new switches. |
| Deadlock | The number entered defines the time which the W-ELP print processor or port monitor is waiting until the convert.exe program, which is the ELP performing software, needs to be finished. The default value of minus one (-1) indicates an infinite wait time. Any positive number is the wait time in half minutes (500ms)*. Example for a value of 2: The process will either return when the convert.exe is finished or run into its error recovery mode after 1 minutes. The recovery mode is indicated in the Windows Application Eventlog as a warning. * If the registry value if SleepTime is changed then the waiting time is calculated as the followine: Deadlock * 60 * SleepTime |
| DIMM mode | This key is by default turned off. It should be set only if the W-ELP Windows software is used to configure and emulate a printer ELP firmware DIMM (Ricoh). Turned on, the windows version should perform exactly like the firmware version. Functions like e-Mail, PDF, and all automatic executed rules like Queue name or Driver name based are ignored. In addition, after applying the new setting and restarting the Control Center, the special macro and .ini file download buttons are accessible. Simply add in the arguments field on the ADMIN Tab in the W-ELP Control Center software a key -p7 (Before the minus sign needs to be a blank, after the term as well). |
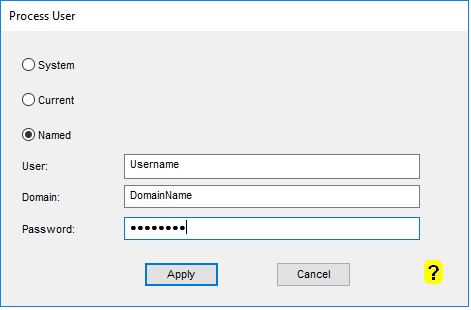
| Process user |
1. "System": This is the default setting. W-ELP´s convert.exe process is executed in the local SYSTEM user context. 2. "Current": run the convert.exe process in the context of the print job owner. This option is the predecessor of the former "run as user" option of W-ELP. 3. "Named": run the convert.exe process in a defined domain user account´s context like a service user account. Important: If the user has no interactive login rights then the the appropriate checkbox must be enabled and the user must be part of the local Administrator group. Usually the options "Current" and "Named" need to be turned ON only if data has to be sent to another PC/server using In/OutArchiveDir, In/OutPort, or the software is physically installed on another server or within a batch process. This guarantees that either the sending Username in the print spooler is preserved in the receiving server or the credentials which have sufficient permissions on the target folder can be supplied. It is also recommended to use "Current" if the print job is split into the same print queue in order to preserve the user name on the second run. refer to example 7 of split mailmerge print files in their single documents. Please always use UNC names for addressing the directories or your software. Volume names might not work! Notes:
More information about changing the user context can be found here. |
| E-Mail Call |
The settings are described here. |
| Resent hidden popups | Every dialogue box which is closed with the term "Don't show again" checked can be forced to be shown again. |
This section defines, how the Control Center should behave, and what tabs should be displayed.
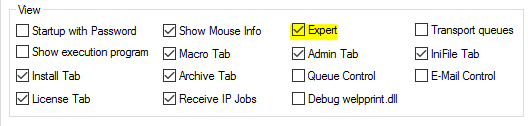
| Startup with Password | The Control Center can be protected by a password. Once activated here, upon the next start of the software, an additional window pops up and a password can be set by clicking on the Change Password button. The function can be turned off any time. |
| Show Mouse Info | Activates the short online help while setting the mouse pointer over the windows fields, or other elements. The text is also displayed at the bottom of the main window. |
| Expert | Turns the total view of all options on and off. |
| Transport queues | Please use this setting only when you are advised by stethos to do so. This feature can be used in order to allow two different ways of printing at the same time: - When the installed driver is used to raster the job, like when printing from office applications, W-ELP will be bypassed. - If ready-to-print spool files arrive in the printer queue W-ELP will process them. |
| Show execution program | The ELP process software convert.exe (see beginning of this page) normally runs silent in the back ground. By enabling this key, for every processed print job a DOS Box is opened, and after it is done is closed again. Certainly it is too fast processed for reading some output. Use the .ini file key StopPrgEnd in order to close the window with a manual key press. This key is dangerous for your server memory management! Please read the keys description before using it. Please note that Process User (see above) cannot be set to System in order to show the execution program. |
| Macro Tab, Configuration Tab, Install Tab, Archive Tab, Get IP Jobs, License Tab | Turn them off, if they are not used, this makes the Control Center a little more handy. For applying the changes, press Apply Button and restart the software. |
| Admin Tab | IMPORTANT: Once the admin tab is turned off, the admin register tab will not be displayed on the next program call. You will NOT be able to uncover the Admin tab again.The only way to do that is to open the PC's registry, HKEY_LOCAL_MACHINE\Software\Wow6432Node\welp\welpprint and change the value of the key Showregister to 415 which reflects the default value. |
| Queue Control, E-Mail Control | Obsolete functions that are not supported anymore and provided "as-is" |
| Debug welpprint.dll | The welpprint.dll is the interface between the MS Windows queue and the ELP printing process convert.exe. This option enables the debugging of the DLL. Once activated, ELP generates for every print job several message windows, which will stop the process until the messages are manually closed. So you better leave this option off all the time, or you have to connect yourself via console (!) to your server and apply OK to all opened ELP system message windows. |
3. Special W-ELP settings, which are only available for the ELP version for MS Windows.
W- ELP uses three external software packages: e-mail client (Windows PowerShell must be installed and running properly), a PCL5 and PCL6 to TIFF converter (bundled in the setup) and a PCL5 and PCL6 to PDF converter (bundled in the setup).

It is strongly recommended to configure the e-mail software and enter some valid e-mail addresses into the Admin e-mail address field. ELP will send out an e-mail if the software fails during processing the data. These addresses are used to get e-mails about errors in print jobs. When you enter more than one the addresses they must be separated by comma. By clicking on "Send test e-mail", the entered e-mail addresses must get a test mail from the W-ELP Control Center.
Instead of using the PowerShell you can also use PowerShell Core or the freeware e-mail client Blat. The type of software used for SMTP e-mail is controlled by a text based config file named MailConf.ini which must reside in the forms folder. For further details how to configure Blat please download the blat legacy package and follow the instructions of the provided ReadMe.pdf.
The e-mail feature is used for three purposes:
-
Informs admins if the DLL detects a problem (should never happen)
-
Send out automatically scheduled FleetMeter results via e-mail
-
Send out print jobs or single job items by e-mail and faxes to clients, users or databases
The PDF and TIFF converter program calls can be adjusted to their installation paths. For the TIFF converter you can do that in the section "External Software" and for the PDF converter it must be done in the file PDFConf.ini which resides in the Workpath (e.g. C:\ProgramData\Welp).
On APPLY all changes of this section are stored.
4. Access to various log files.
While the ELP process is called from the print job, various default report files can be produced on request. Here is a short cut to have a look at them.

| Debug folder |
If the debugging option is activated, ELP stores by default the generated report into the c:\ProgramData\WELP\Debug\<QUEUNAME>\log_file_<DATESERIAL>.txt file. Clicking on this button opens ..\Debug folder with the Windows Explorer. Note: Any following job won´t overwrite the log file. Instead for each new job there will be a new log file. See here for further details. |
| If an e-mail sending process is enabled, and the logging option is activated, every e-mail sent will be listed in the opened log file. As the file is never erased or truncated, it is recommended to setup a process to clean it from time to time. | |
| Error | Any error in data streams or while ELP processes are recorded automatically in the file, which can be opened into notepad through this button. Like above the file is never erased or truncated. During the startup of the W-ELP Control Center this files is also checked if present and then a user prompt will be shown if this file should be displayed for review. |
| Accounting | Opens the default Account file, which is only extended, if the standard accounting function is enabled. Each print job, and all collected information of the job can be accounted. See here from more details: Accounting |
| Diagnostics |
By hitting the button "Generate Diagnostics Bundle" one single file is generated which includes everything for a support request. Please note that if you are advised to include spool files as well you have to enable the capture mode upfront. The Data transfer mode "HTTPS" will only work if your system has Internet Access and will directly transfer the Diagnostics Bundle to stethos. If you want or need to transfer the generated file manually please chose this option before generating the bundle itself. |
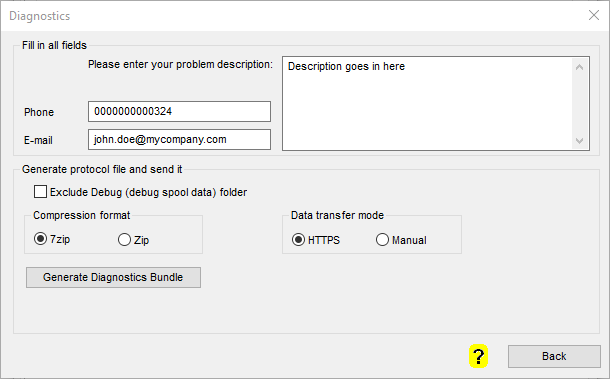
The Control Center will ask for permission to erase it after having opened one of the files.
Related articles: Startup with Password, Debugging, The E-Mail client, Running convert.exe process in user context