 DE
DE  EN
EN 
This window is opened, after the print or print / print all button from the Archive Register Tab is selected.
You may return to the Archive Register and drag and drop more print files in here. Maybe you intend to create a booklet. Any other file from other applications like Explorer can be dropped in as well.
The options of this print window are:
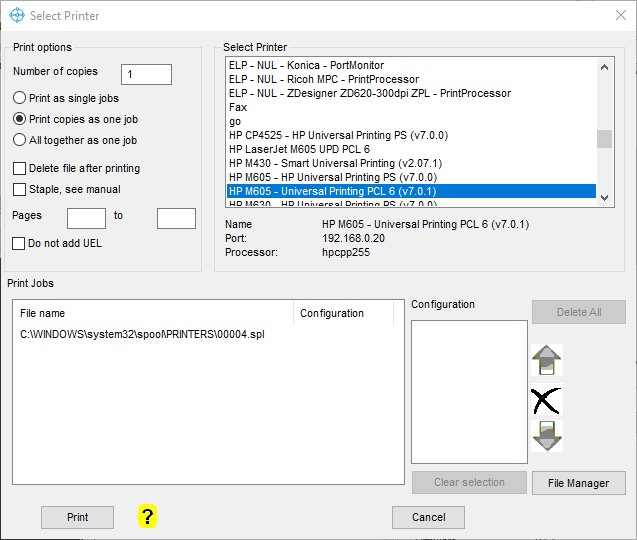
| Number of copies | several selected jobs are printed in sets, so the first copy of the first job, then the first copy of the second job, ... second copy first job... . |
| Print as single jobs | Let's say you have 2 jobs with 3 copies, so in the outgoing queue of the selected printer you will have 6 jobs: 1, 2, 1, 2, 1 and 2 |
| Print copies in one job | Same example will result in 3 jobs in the out queue. 12, 12 and 12 |
| All together in one job: | Same example will result in 1 job in the out queue. 121212. Nobody can interfere with another job in between. |
| Delete jobs after printing | If the files should be deleted after being sent to the out queue, mark this option. |
| Staple |
With those limitations, you can even staple the jobs. Therefore the previous ways of printing play a big role.
|
| Pages from / to |
You may enter the page numbers from and to for narrowing down the printed part of the document, copy or even the whole document. Same limitations apply as for stapling. 3 Jobs with each 5 pages, selection is made from page 2 to 3 and they are printed with copy factor 2. |
| Do not add UEL |
If this checkbox is ticked then the lines below are not added to the released print job |
| Print Jobs | After having selected a job, it can be moved up and down in the print list, or with X simply deleted from the list. |
| Delete all | Deletes the print jobs form the list |
| The printing position of the print files in that list can be changed by making one file and: A) move it up or down in the list clicking on the arrow icons B) Remove it form the list by clicking on the X icon |
|
| Select printers | You may select any destination queue for printing. Be careful using an ELP activated queue, as then the process may restart from the beginning. Or, have a look into the manual and find the rule to apply, that those files are kept unchanged. |
| File Manager | As indicated above, you may use the File Manager to drag and drop other print files into the list. |
| Configuration | Select a print file first, then select a configuration to apply the configuration. This function does ticket a job, using a predefined ELP_Command set. If you select one or more configurations, the jobs can only be printed on queues which are enabled for W-ELP printing. Each job will be printed as a single file. Therefore most of the options are automatically deactivated. |
| Clear selection | Removes a configuration. |
Notes:
-
You are able to resend the jobs to any ELP activated queue, especially for using the ticketing option. But if the jobs are already as they have to be and should not be changed, you can send them to any other non ELP activated queue. This is why the ELP Control Center shows all printers for selection.
-
I you intend to send the final ELP archived files again to an ELP enabled queue and you do not want to let ELP do any changes on the print stream, ask your Administrator to setup ELP like that:
[Do passthrough archive print jobs]
Search_Binary=PPADMIN ARCHIVEPRINT
PassThrough=ON
Exit=ON
-
For convenience the ELP Control Center offers the ability to staple the selected job/s. But as indicated above there are some rules, and if they do not apply, please resend the job through a pre-configured ELP process.